Make Your Own Aloe Vera Soap: A Sustainable Solution for Skin Care

Make Your Own Aloe Vera Soap: A Sustainable Solution for Skin Care

If you’re a gardener or someone who loves sustainable, plant-based recipes, making your own aloe vera soap is a project you’ll enjoy. Not only is it incredibly satisfying to create something from scratch using plants from your garden, but it’s also a great way to reduce the number of plastic containers from store-bought soaps. And the best part? This recipe is super simple yet highly effective.

Me and my fiance, Iasmina, @lajatattoo used 100% natural ingredients to make it, including plants from our garden but you could twist the recipe and replace/add other stuff.

Why Aloe Vera Soap?

Aloe vera hand soap is just incredibly good for your skin and it could be used for hands, body, and face! It’s a great moisturizer that helps fight skin aging, reduces infections and acne, and boosts the healing effects of wounds! Here are some of the benefits you can expect:

  • Moisturization: Aloe vera is a fantastic natural moisturizer, helping to keep your skin soft and hydrated.
  • Anti-Aging: With its rich mix of vitamins, aloe vera helps fight skin aging, keeping those fine lines at bay.
  • Healing: Known for its healing properties, aloe vera can boost the healing of wounds and reduce skin infections.
  • Acne Control: Thanks to its antibacterial properties, aloe vera is great for reducing acne.

What You’ll Need

For this recipe, we’re keeping it natural, using ingredients that are not only good for your skin but also kind to the environment. Here’s what you’ll need:

  • 5 Leaves of Aloe Vera
  • 1/2 Jar of Dried Lavender
  • 1 Tsp of Vitamin E Oil (Optional)
  • Food-Grade Color (Optional)
  • 1 kg Natural Soap Base.

How to Make Your Aloe Vera Soap

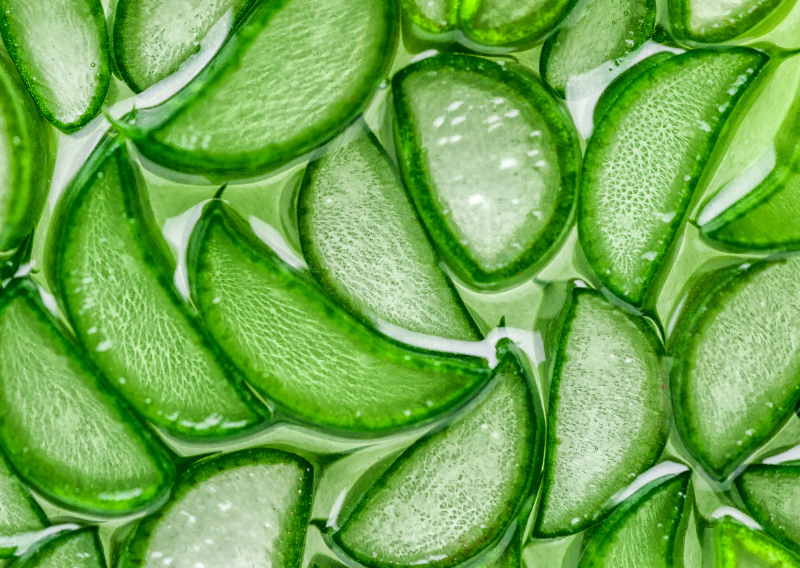
  1. Harvest Your Aloe Vera Leaves: Begin by harvesting your aloe vera leaves. Let them sit in water for 10-15 minutes to remove the yellow latex, which can be irritating to the skin.
  2. Extract the Gel: Scoop out as much gel as possible from the leaves. Don’t toss the green part! Compost it, as it makes an excellent fertilizer for your garden.
  3. Blend the Gel: Blend the aloe vera gel until smooth. This is where the magic starts.
  4. Melt the Soap Base: In a double-boiler pan, melt your natural soap base. Take your time here—low and slow is the way to go.
  5. Mix It Up: Once the soap base is melted, mix in your blended aloe vera gel. Stir until it’s well incorporated.
  6. Add the Extras: Toss in your dried lavender and Vitamin E oil (if using) and mix again. If you’re feeling creative, add a few drops of food-grade color to give your soap a unique look.
  7. Mould and Set: Pour the mixture into a silicone mold and let it set until solid.

And that’s it! You now have your very own homemade aloe vera soap. It’s perfect for use on your face, body, and hands. Plus, it’s a thoughtful gift for friends and family—everyone loves a handmade touch.

Friendly Reminder: While you can make soap using lye, I prefer to skip it. Lye can strip some of the beneficial properties from your natural ingredients, and we want to keep all that goodness intact.

So, go ahead and give this recipe a try. Not only will your skin thank you, but you’ll also feel good knowing you’ve made a small step towards a more sustainable lifestyle.

Happy DIY!

How to Cook Fava Beans Without Waste: A Delicious Recipe

How to Cook Fava Beans Without Waste: A Delicious Recipe

When it comes to gardening and cooking, nothing beats the satisfaction of knowing you’re using every part of your harvest. If you’ve been growing fava beans (also known as broad beans), this blog will excite you. With a little creativity, you can turn your entire fava bean plant into delicious, sustainable recipes that are sure to impress. From crispy snacks to tasty falafel, here’s how to enjoy fava beans while staying true to a zero-waste lifestyle.

Don’t Toss Those Pods: Make Falafel!

While many people focus on the beans themselves, the pods are actually perfect for making a unique twist on classic falafel.

What You’ll Need:

  • 2 cups pre-soaked chickpeas
  • 15-20 fava bean pods
  • 3 garlic cloves
  • 1 onion
  • 1 tablespoon paprika
  • 2 pinches of salt
  • 2 pinches of black pepper
  • A handful of fresh parsley
  • Olive oil for frying
  • Optional: cumin, fennel, chili (for a bit of extra kick)

Step-by-Step:

  1. Start by washing your fava bean pods and cutting off the ends. If your pods are fresh and tender, you can skip to the next step. If they’re a bit tougher, give them a quick boil for about a minute to soften them up. Don’t forget to remove the strings.
  2. Toss the pre-soaked chickpeas, fava pods, garlic, onion, paprika, salt, pepper, and parsley into a blender. Blend until smooth. The mixture can be quite dry, so you might need to give it a stir here and there to get everything nicely combined.
  3. Roll the mixture into balls, heat up your olive oil, and deep fry the falafel until they’re golden brown. ( Serve them with your favorite dipping sauce, and you’ve got a zero-waste snack that’s as delicious as it is sustainable.)

    Crunchy, Crispy Fava Beans

    If you love a good snack that’s both crunchy and healthy, crispy fava beans are a must-try. These little bites are incredibly easy to make and perfect for munching on the go.

    What You’ll Need:

    • Fava beans (as many as you like)
    • Olive oil
    • Your favorite spices (paprika, garlic powder, chili powder—whatever tickles your taste buds)

    Step-by-Step:

    1. Preheat your oven to 180°C (350°F). Toss your fava beans with a bit of olive oil and spices, then spread them out on a baking sheet.

    2. Bake for about 30 minutes, keeping an eye on them and giving them a stir a couple of times to ensure they crisp up evenly on all sides. The result is a crunchy, protein-packed snack that’s way better than anything you’ll find in a store.

    Quick Tip

    After you’ve harvested your fava beans, don’t forget to cut the plants at the base and compost the leaves and stalks. By composting, you’re returning valuable nutrients to your soil, ensuring that next season’s crops are just as abundant. And if you want to be extra resourceful, leave a few pods on the plant to dry out. These dried seeds can be saved for next year’s garden, giving you a head start on your next zero-waste fava bean adventure.

    From falafel pods to crispy fava beans, there are endless ways to enjoy your fava bean harvest without any waste. Plus, it’s a fun way to experiment in the kitchen and impress your friends with something a little different.

    So next time you’re staring at those fava bean plants in your garden, remember: every part of the plant has potential. And who knows, you might just discover your new favorite recipe in the process.

    🎥 Shoutout to my fiance Iasmina, @lajatattoo for filming the process and helping bring these zero-waste recipes to life.

    Happy cooking, and even happier eating!

    How To Transform Your Leftover Veggies into Homemade Stock Cubes

    How To Transform Your Leftover Veggies into Homemade Stock Cubes

    Ever find yourself with a pile of leftover vegetable scraps at the end of the week? Instead of throwing them out, why not turn them into something incredibly useful—homemade stock cubes? This not only helps reduce waste but also gives you a natural, plant-based alternative to store-bought stock cubes, which often contain preservatives and artificial flavors. The process is simple, and you can make enough to store and use for months.

    The Benefits of Homemade Stock Cubes

    Making your own stock cubes offers more than just reducing food waste. For starters, you control the ingredients, allowing you to avoid additives, excessive salt, and anything else that doesn’t fit with your health goals. Homemade stock cubes are packed with vitamins and minerals from the vegetables, especially when you use nutrient-rich scraps like broccoli stems, carrot peels, and cauliflower leaves.

    These stock cubes are also ideal for those following a plant-based diet. They add depth and flavor to soups, stews, risottos, and sauces without relying on animal products. Plus, they’re a clever way to incorporate extra vegetables into your meals, boosting the nutritional value of your dishes.

    Ingredients

    To get started, gather your leftover veggies. Here’s what you’ll need:

    • 1kg Assorted leftover vegetables (carrot peels, celery, broccoli stems, cauliflower leaves, soft veggies, onion, leeks, mushrooms, etc.)
    • 4 cloves of garlic
    • 1 teaspoon of salt
    • 1 teaspoon of nutritional yeast
    • Herbs & spices (your choice!)
    • Salt & pepper
    • 2 tbsp Olive oil

      Instructions

      1. Start by making sure your leftover vegetables are clean and edible. Then, chop them into smaller pieces to ensure they cook evenly.
      2. In a large pan, heat 2 tablespoons of olive oil over medium heat. Add your chopped vegetables and sauté until they release their flavors and most of the water has evaporated. The key here is to coax out all those delicious flavors, so don’t rush this step!
      3. Let the sautéed veggies cool slightly, then transfer them to a blender. Add the garlic, herbs, spices, salt, and black pepper. Blend the mixture until it becomes a smooth puree.
      4. Line a flat, shallow pan with parchment paper and pour the vegetable puree onto it. Smooth it out evenly to ensure consistent freezing. Place the pan in the freezer and let it freeze until solid.
      5. Once frozen, remove the vegetable puree from the pan and cut it into cubes. You can either wrap each cube in parchment paper or place them all in an airtight container and store the cubes in the freezer.

      Note: Your homemade vegetable stock cubes can last for 3-4 months when stored properly in the freezer.

      How to Use Your Stock Cubes

      Whenever your recipe needs a flavor boost, just drop in a cube or two. These homemade stock cubes will add a rich, savory depth to your dishes, transforming ordinary meals into something special. The best part? You made them yourself, using ingredients that might have otherwise gone to waste.

      So, the next time you find yourself with a fridge full of veggie odds and ends, remember that you can give them a new life as tasty, sustainable stock cubes.

      Happy cooking!

      Easy Homemade Plant-Based Mochi Recipe: Delicious and Simple to Make

      Easy Homemade Plant-Based Mochi Recipe: Delicious and Simple to Make

      Me and my fiance Iasmina, @lajatattoo are addicted to mochi and after experimenting in the kitchen we made them with our own twist! I found so many overcomplicated recipes to make mochi while it could be such an easy process and absolutely delicious!

      Our method is easy, straightforward, and—most importantly—delicious. Whether you’re a gardener or just someone interested in sustainable, plant-based recipes, this homemade mochi is for you. I hope you’ll love them as much as we love them.

      Mochi Dough

      Mochi dough is made from glutinous rice flour, also known as sweet rice flour. Despite the name, it’s gluten-free, so don’t let that throw you off. Here’s what you’ll need:

      Ingredients:

      • 180 ml water
      • 120 g glutinous rice flour / sweet rice flour
      • 60 g white sugar
      • Cornstarch for dusting
      • Optional: 1-1/2 tsp cocoa powder, matcha powder, or any flavoring powder you prefer

      Step-by-Step:

      1. In a medium pan, mix the water, rice flour, sugar, and your chosen flavor powder. Cook over medium heat until it starts to thicken. Once it does, lower the heat and keep cooking until you get a nice doughy consistency.
      2. Transfer the dough onto a cutting board or plate dusted with cornstarch. Make sure the dough is well-covered to prevent sticking (trust me, this stuff is sticky!).
      3. Let the dough cool. Once it’s cooled down, divide it into 6-8 balls. These will be your mochi wrappers, ready to be filled with all sorts of deliciousness.
      4. Remember to keep some extra cornstarch handy for dusting your fingers as you work—mochi dough has a way of wanting to stick to everything it touches!

      Mochi Filling

      We like to use a creamy, plant-based white chocolate filling with a hint of matcha, but you can get as creative as you like. Here’s our go-to recipe:

      Ingredients:

      • 160 g white chocolate (plant-based works perfectly)
      • 1 tsp matcha powder
      • 3 tbsp coconut milk (just the thick cream from the top of the can)
      • 1 tbsp cornstarch

      Step-by-Step:

      1. Mix all the ingredients in a bowl and double-boil until everything is melted and well-blended.
      2. Let the mixture cool completely before using it to fill your mochi.
      3. Alternatively, you can fill your mochi with peanut butter, white bean paste, red bean paste, ice cream, strawberries, or even cookie dough. The possibilities are endless!

      Pairing Mochi with Plant-Based Foods

      Pair your mochi with a fresh fruit salad, perhaps using fruits you’ve grown yourself (hello, sustainable gardening!). If you’re feeling adventurous, try it alongside a matcha latte or green tea for a flavor-packed experience.

      For a savory twist, serve mochi as a side to a veggie stir-fry. The subtle sweetness of the mochi complements the umami flavors in the stir-fry beautifully. You can also enjoy mochi with a dollop of homemade fruit preserves.

      Mochi is a fun and versatile treat that’s surprisingly easy to make at home. With just a few simple ingredients, you can create a batch of chewy, sweet mochi that’s perfect for any occasion. You can easily customize it to match your taste, whether you’re in the mood for a hint of matcha, a burst of cocoa, or a gooey peanut butter filling.

      So, the next time you’re craving something sweet, give homemade mochi a try. It’s a delicious way to enjoy plant-based ingredients, and who knows—it might just become your new favorite treat!

      Happy cooking!

      Learn How To Make an Easy DIY Worm Compost Tower at Home

      Learn How To Make an Easy DIY Worm Compost Tower at Home

      If you’re searching for a simple and sustainable method to recycle food waste while enriching your garden, a DIY Worm Compost Tower could be the perfect solution! Whether you’re an experienced gardener or just starting out, this easy project helps reduce waste and produces nutrient-rich compost that your plants will thrive on. Plus, it’s a fun, eco-friendly activity for anyone who cares about sustainable gardening.

      Recently, our friend @jacks_patch visited our urban garden, and together we built a DIY Worm Compost Tower using bamboo and worms. The great thing about this project is how simple it is to set up, even in small spaces like pots, and it works both indoors and outdoors. This efficient system transforms your kitchen scraps into nutrient-rich compost, all while significantly reducing the waste that ends up in the landfill.

      Why Build a DIY Worm Compost Tower?

      Composting with worms, or vermiculture, is a great way to recycle organic waste. Worms feed on your food scraps and produce worm castings, which are packed with nutrients for your plants. A Worm Compost Tower enhances this process by integrating composting directly into your garden bed or pot, allowing your plants to benefit from these valuable nutrients right where they grow.

      Here are some perks of using a DIY Worm Compost Tower:

      • Cut Down on Waste: Instead of throwing away food scraps, you can feed them to your worms. This reduces landfill waste and turns it into a valuable resource for your garden.
      • Nutrient-Rich Fertilizer: Worm castings act as an excellent natural fertilizer, full of essential nutrients like nitrogen, phosphorus, and potassium. They release these nutrients slowly, providing a steady supply for your plants.
      • Boost Soil Health: The compost from worms enhances soil structure, helps retain moisture, and promotes healthy root growth.
      • Space-Saving and Versatile: This setup is perfect for small spaces. You can use it in raised beds, large pots, or even directly in the ground, making it a flexible addition to any garden.

      How to Create Your Own DIY Worm Compost Tower

      Building a Worm Compost Tower is a breeze, and you only need a few materials. Here’s how you can make one:

      Materials You’ll Need:

      • Bamboo or PVC pipe (we used bamboo, but PVC works too).
      • A saw or cutting tool.
      • A drill with a 12 mm drill bit.
      • Worms (optional, as they might naturally find their way into the tower).

      Steps to Build:

      1. Measure and Cut the Pipe
        • Measure the depth of your raised bed or pot, then add an extra 10-15 cm (about 30 cm in total).
        • Cut a section of your bamboo or PVC pipe to this length.
      2. Drill Holes
        • Drill holes around 2/3 of the pipe, leaving the top 1/3 without holes. These holes should be 12 mm in size, allowing worms to move in and out with ease.
      3. Install the Tower
        • Dig a hole in the center of your raised bed or pot, deep enough to bury the drilled portion of the pipe, leaving the top part above the soil.
        • Place the pipe in the hole, making sure it’s stable.
      4. Add Worms and Food Scraps
        • Add a handful of worms to the tower, or wait for them to naturally find their way in.
        • Start adding food scraps like fruits, vegetables, and coffee grounds to the tower.
      5. Cover the Top
        • Cover the top of the tower with a pot, muslin cloth secured with an elastic band, or any breathable material to keep pests out while letting air circulate.

      Caring for Your Worm Compost Tower

      Your worms will handle most of the work, but here are a few tips to keep things running smoothly:

      1. Regular Feeding: Keep adding food scraps to the tower. The worms will gradually break them down into compost.
      2. Moisture Check: The tower should be moist but not soggy. If it starts to dry out, add a little water to keep the worms comfortable.
      3. Harvest the Compost: Over time, the worms will turn the scraps into compost. You can harvest it by removing the tower and spreading the castings around your plants.

      Building a DIY Worm Compost Tower is a simple and effective method to cut down on waste and boost your garden soil. With just a few materials and a little time, you can create a composting system that fits any space, no matter how small. Give it a go and see how your garden flourishes with the help of your new worm companions.

      Happy gardening!

      0
        0
        Your Cart
        Your cart is emptyReturn to Shop