3 Easy Veggies to Grow in Your Garden: Courgettes, Tomatoes, and Potatoes

3 Easy Veggies to Grow in Your Garden: Courgettes, Tomatoes, and Potatoes

For the last ten years, I’ve planted many different kinds of plants in my small garden in London. I’ve used pots and raised beds to learn how to garden, sometimes making mistakes. But today, I want to tell you about the three vegetables that are easiest to grow. I’ve also learned some good ways to grow them. These vegetables are easy to grow, even if you’re just starting out. You can try them in many different dishes.

Courgettes (Zucchini)

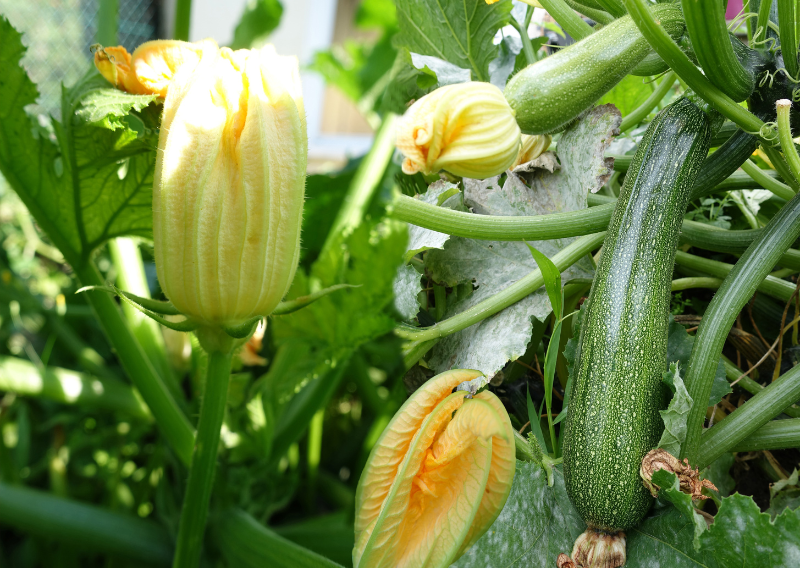
Courgettes are a wonderful choice for any gardener, whether you have a big garden or just a small balcony. These plants are easy to grow and can be used in many different ways.

Why They’re Easy to Grow:

  • Vertical Growth: One reason courgettes are so easy to grow is that they can be trained to grow upwards. This is perfect for small spaces. Just tie the plant to a trellis or a strong stake, and you’ll be able to grow a lot of courgettes without taking up much room.
  • Edible Flowers: Another amazing thing about courgettes is their edible flowers! But here’s a tip: only pick the long flowers, which are the male ones. Leave some on the plant to help it make more courgettes.
  • Harvest at Any Stage: You can also harvest courgettes at any stage of growth. Whether they’re small and soft or big and firm, they’re all delicious. 

Tomatoes

Tomatoes are a staple in many gardens, and for good reason. They’re not only easy to grow but also packed with flavor that’s hard to beat. Plus, there’s nothing quite like picking a fresh, ripe tomato from your garden.

Why They’re Easy to Grow:

  • Deep Planting: One of the best tips I’ve learned is to plant your tomatoes deep. The plants have tiny hair-like structures called trichomes along the stem, which can transform into roots if buried. This makes the plant more stable and helps it absorb more nutrients.
  • Keep the Base Clean: To avoid soil-borne diseases, keep the bottom of your tomato plants clean. Mulching around the base also helps reduce the bounce-back effect, where water splashes up from the soil and onto the leaves, potentially spreading disease.
  • Suckers for More Plants: Tomato plants naturally produce suckers (side shoots). You can remove these from indeterminate varieties to prevent the plant from wasting energy, making it more manageable. You can also use these suckers to grow even more tomato plants.

Potatoes

Potatoes are another vegetable that’s incredibly easy to grow, even in small spaces. With just a few simple steps, you can enjoy a bountiful harvest of this versatile veggie.

Why They’re Easy to Grow:

  • Chitting (Sprouting): Start by letting your potatoes sprout before planting. Simply place them upright in a container, avoiding direct sunlight and humidity, and wait for the sprouts to appear.
  • Grow Bags: If you don’t have enough space, grow bags are a perfect solution. You can move them around as needed, and they’re great for keeping the soil perfect for your plant.
  • Mulch with Straw: To retain moisture you must mulch them with straw. This helps conserve water and keeps the tubers cool and protected from direct sunlight.

Growing your own veggies doesn’t have to be complicated. Courgettes, tomatoes, and potatoes are three of the easiest plants to start with, and they offer a lot of rewards for the effort. I’ve made plenty of mistakes over the years, but I hope these tips and shortcuts help you avoid the same mistakes and enjoy a successful, bountiful harvest.

Happy gardening!

Chicken of the Woods: Easy, Delicious Recipe for Flavorful Meals

Chicken of the Woods: Easy, Delicious Recipe for Flavorful Meals

It finally happened! After a long hunt, my friend @jacks_patch and I discovered my first Chicken of the Woods in the heart of London! I’m still thrilled; it’s past prime time, but who cares? It still tastes wonderful and has an unbelievable weight of 4.2 kg. The experience of finding such a unique mushroom in the urban jungle of London is nothing short of magical. We carefully harvested it, taking care not to damage the surrounding environment, and couldn’t wait to bring it home and cook it.

Chicken of the Woods has a flavor that is quite close to chicken, and even the texture and scent are comparable. This mushroom is an incredible substitute for those looking to add a meaty texture to their plant-based dishes. Its ability to absorb flavors makes it versatile for various recipes.

I also discovered another interesting find: King Alfred’s cake. When dried, this mushroom serves as an excellent fire starter, burning slowly and steadily.

For a perfect pairing with Chicken of the Woods, I made a tasty salad that bursts with flavor. Here’s a simple yet delicious recipe you can try:

Strawberry Vinaigrette:

  • 150 g strawberries
  • 2 tbsp olive oil
  • 2 tbsp rice vinegar
  • 2 cloves garlic
  • 2 tbsp maple syrup
  • Salt and pepper to taste

Salad Ingredients:

  • Mixed nuts
  • Leafy greens
  • Fresh strawberries
  • Vinaigrette (see recipe above)
  • Onions
  • Vegan feta cheese

Seasoning for “Chicken”:

  • Plant-based butter
  • Sage
  • Chives
  • Garlic

How to Prepare the Chicken of the Woods:

  1. Season it with plant-based butter, sage, chives, and garlic.
  2. Sauté it until it’s golden and crispy on the outside while remaining tender on the inside.
  3. Serve it atop a bed of leafy greens, garnished with mixed nuts, fresh strawberries, and vegan feta cheese.
  4. Drizzle with the homemade strawberry vinaigrette for a refreshing, flavorful dish. This combination of textures and flavors showcases the mushroom’s unique qualities and complements its rich taste perfectly.

Quick note: I’ll tweak a few things next time, such as pressing it with hot cast iron on top and pre-cooking it on the stove for a nicer texture, but overall, I’m pleased with the results! The adjustments will help achieve a more refined texture and enhance the mushroom’s flavor even further.

A huge thank you to my fiance, @lajatattoo, for assisting with the cooking and filming. Your help made this culinary adventure even more enjoyable! The experience of cooking together and sharing this discovery was truly special.

Chicken of the Woods is not just a mushroom; it’s a gem waiting to be explored. Whether you’re a seasoned forager or new to wild mushrooms, this find is sure to add an exciting twist to your plant-based meals. Foraging for such unique ingredients opens up a world of culinary possibilities and connects us to nature in a meaningful way. Give it a try and let your taste buds be amazed!

Happy cooking and foraging!

3 Simple and DIY Sustainable Tips That You Can Try At Home

3 Simple and DIY Sustainable Tips That You Can Try At Home

If you’re like us and enjoy doing DIY and living a sustainable lifestyle, you’ll agree that one of the greatest places to start is in your garden and house. Creating your own natural products reduces the plastic waste with store-bought items. This practice has a significant environmental impact, and by doing your own items, you can take an active role in reducing your carbon footprint. Here are three DIY sustainable tips to help you embrace a more eco-friendly way of living.

Make Your Own Aloe Vera Soap

Creating homemade aloe vera soap is a wonderful way to incorporate sustainability into your daily routine. Aloe vera is not only known for its soothing and healing properties, but it’s also easy to grow and harvest.

Aloe Vera Soap Recipe:

  • 5 leaves of aloe vera
  • 1/2 jar of dry lavender
  • 1 tsp of vitamin E oil
  • Food-grade color (optional)
  • 1 kg natural soap base

Instructions:

  1. Begin by harvesting your aloe vera leaves. To remove the yellow latex, let the leaves sit in water for 10-15 minutes. This step ensures that your soap is gentle on the skin.
  2. Blend the aloe vera gel with dry lavender and vitamin E oil. The lavender adds a calming scent and enhances the soap’s natural benefits.
  3. Melt the natural soap base, then mix in the aloe vera blend. Add food-grade color if desired.
  4. Pour the mixture into molds and let it harden. Once set, your soap is ready to use!

Note: While some soap recipes use lye, it can strip away some of the beneficial properties of natural ingredients. This recipe avoids lye, allowing you to preserve the goodness of aloe vera.

Make Your Own Eco-Friendly Candles

Candles are a great way to create a warm and inviting atmosphere in your home. By making your own candles using soy flakes or beeswax, you can avoid the harmful paraffin wax found in many commercial candles, which releases toxins when burned.

Candle Recipe:

  • 4 cups soy flakes or beeswax
  • 2 wicks with metal bases
  • 20-30 drops of essential oil (try thyme and cedarwood for a soothing scent)
  • Dry lavender flowers and orange slices for decoration
  • 2 glass or metal jars
  • 1 skewer or chopstick for mixing

Instructions:

  1. Melt the soy flakes or beeswax in a double boiler.
  2. Once melted, add your essential oils and mix well.
  3. Place the wicks in the center of your jars and pour in the wax mixture.
  4. Add dried lavender flowers and orange slices to the top for a decorative touch.
  5. Allow the candles to cool and harden before trimming the wicks.

    Create a Refreshing Cucumber Mint Body Scrub

    Exfoliating with a homemade body scrub is not only good for your skin but also good for the environment. A cucumber mint body scrub is a natural, sustainable alternative that’s both refreshing and eco-friendly.

    Body Scrub Recipe:

    • 6-8 slices of cucumber
    • 1 cup of white sugar
    • 40 leaves of mint
    • 2 tbsp coconut oil or olive oil

    Instructions:

    1. Blend the cucumber and mint leaves until smooth.
    2. In a bowl, mix the cucumber-mint blend with sugar and oil.
    3. Transfer the mixture to a jar, and it’s ready to use!

    This scrub exfoliates and leaves your skin feeling refreshed and hydrated.

    Sustainability is all about making small, mindful choices that add up to a big impact. The 3 samples above are just some of our favorites but you can always experiment and see how your creation goes. By trying these, you not only reduce your reliance on harmful chemicals and plastics, but you also contribute to a healthier planet. Give these DIY tips a try and enjoy the benefits of a more sustainable way of living.

    Happy gardening!

    How to Cook Beetroot: Easy and Fun Recipes for Delicious Dishes

    How to Cook Beetroot: Easy and Fun Recipes for Delicious Dishes

    Beetroots are one of those lovely vegetables that offer far more than meets what one might expect. Beets, with their earthy, sweet flavor and vivid color, add a unique touch to the food you make. What many people don’t realize is that beetroots are extremely adaptable, with every part—roots, stems, and leaves—edible and nutritious. This makes them a perfect fit for zero-waste cooking, allowing you to get the most from your harvest while reducing food waste.

    The Misunderstood Giant Beet

    It is a frequent misconception that larger beets, such as those harvested at Homeacres, are rough and bitter. In actuality, these large beauties are often soft and sweet, loaded with flavor and suitable for a variety of cuisines. Whether you grew your own beets or bought some large ones at the store, don’t be afraid to experiment with them in the kitchen. You might be amazed at how enjoyable they can be!

    Why Experimenting with Beetroot is Fun

    Cooking with beetroot feels like an artistic adventure. The brilliant color alone adds excitement to any dish, and the flavors are surprisingly wide, ranging from sweet to earthy to slightly acidic. Also, working with beetroots allows you to test out new dishes that use every part of the plant, ensuring that nothing goes to waste. It’s a fun challenge that not only improves your cooking abilities but also promotes a more sustainable living.

      Zero Waste Beetroot Recipes

      Beetroot Powder

      If you’ve ever wondered what to do with beetroot peels, this recipe is for you. Instead of tossing them, why not turn them into a flavorful powder that can be used as a condiment, in broths, or even mixed with salt for a colorful seasoning?

      Ingredients:

      • Beetroot peels

      Instructions:

      1. Dehydrate the beetroot peels overnight or in the oven on low heat until completely dry.
      2. Once dried, grind the peels using a mortar and pestle or a blender until you achieve a fine powder.

      Note: This powder is a fantastic way to add a touch of beetroot flavor to a variety of dishes without wasting any part of the vegetable.

      Beetroot Stem Pesto

      The next time you trim beetroot stems, don’t toss them out! These often-overlooked parts of the beet can be transformed into a delicious pesto that’s perfect for spreading on toast, mixing into pasta, or using as a dip.

      Ingredients:

      • 5 beetroot stems
      • 4-5 Tbsp olive oil
      • Mixed nuts (your choice)
      • Nutritional yeast (a great Parmesan substitute that adds protein)
      • 2 garlic cloves
      • Salt, to taste

      Instructions:

      1. Combine all ingredients in a blender or food processor.
      2. Blend until smooth, adding more olive oil if needed to reach your desired consistency.

      Note: You can follow the same process with beetroot leaves or even add them to the stems for an extra boost of nutrients and flavor.

      Beet Kvass

      For a refreshing, health-boosting drink, try making beet kvass. This traditional fermented beverage is not only delicious but also packed with probiotics, making it great for gut health.

      Ingredients:

      • 8 cups water
      • 2 Tbsp Himalayan salt
      • 8 medium beets, chopped
      • 3 garlic cloves, peeled
      • Any herbs of your choice (dill, thyme, etc.)

      Instructions:

      1. Start by sterilizing your jars by boiling them in water.
      2. Once the jars are ready, add the chopped beets, garlic, and herbs.
      3. Dissolve the salt in water and pour over the beets until they’re fully submerged.
      4. Cover the jars with a cloth or loose lid and let ferment at room temperature for 5-7 days.

      Note: The longer you let the kvass ferment, the stronger the flavor will be. Once it reaches your desired taste, transfer the jars to the fridge to slow down the fermentation process.

      With these simple recipes, you can make the most of your beetroot harvest while minimizing waste. From turning peels into powder to transforming stems into pesto, and even fermenting the roots into a delicious beverage, every part of the beetroot can be used in your kitchen. So, get creative, have fun, and enjoy the many flavors and benefits that beetroots have to offer!

      Happy gardening!

      4 Ways to Use Cucumbers: Fresh Ideas from Garden to Table

      4 Ways to Use Cucumbers: Fresh Ideas from Garden to Table

      If your garden is anything like ours, you’re probably swimming in an abundance of cucumbers right now. It’s a wonderful problem to have! With the garden producing so much, we’re constantly inspired to get creative in the kitchen, finding new and delicious ways to use and preserve all the gifts from Mother Nature.

      In this blog, I’m going to share four fantastic ways to use cucumbers that go beyond the ordinary salad. These recipes are perfect for reducing waste and making the most of every part of this amazing vegetable. Whether you’re new to gardening or a seasoned pro, I hope these ideas inspire you not just to grow your own food but to think creatively about how you use it.

      1. Cucumber Noodles: A Fresh and Light Meal

      Cucumber noodles are a refreshing and healthy alternative to traditional pasta. They’re perfect for a light lunch or as a side dish. Here’s how you can make a delicious cucumber noodle salad:

      Ingredients:

      • Red onion
      • Tomato
      • Vegan feta
      • Sesame seeds
      • Tahini
      • Chickpeas
      • Salt & pepper
      • Soy sauce
      • Parsley

      Instructions:

      1. Spiralize your cucumbers into noodles.
      2. Toss the cucumber noodles with chopped red onion, diced tomato, crumbled vegan feta, and a sprinkle of sesame seeds.
      3. Add a dollop of tahini and mix in some cooked chickpeas for protein.
      4. Season with salt, pepper, and a splash of soy sauce.
      5. Garnish with fresh parsley.

      This dish is light, crunchy, and packed with flavor. And don’t throw away those leftover cucumber pieces—save them for your next recipe!

      2. Homemade Cucumber Pickles: A Tangy Treat

      Pickling cucumbers is a great way to preserve them, and it’s easier than you might think. Plus, homemade pickles taste so much better than store-bought ones.

      Ingredients:

      • Enough cucumbers to fill a jar
      • Fresh dill
      • Pepper grains
      • Bay leaves
      • 2 garlic cloves
      • Equal parts white vinegar and water
      • 1 Tbsp kosher salt per 2 cups of liquid

      Instructions:

      1. Slice your cucumbers and pack them tightly into a clean jar.
      2. Add dill, pepper grains, bay leaves, and garlic.
      3. In a pot, heat the vinegar, water, and salt until the salt dissolves.
      4. Pour the hot brine over the cucumbers, making sure they’re fully submerged.
      5. Seal the jar and store it in the fridge. Your pickles will be ready in a few days and can last up to two months.

      Pickles are a fantastic snack, and they’re also great in sandwiches or as a tangy side dish.

        3. Tzatziki: A Creamy, Cool Dip

        Tzatziki is a classic Greek dip that’s perfect with fresh vegetables, pita bread, or as a sauce for grilled dishes. It’s cool, creamy, and bursting with fresh flavors.

        Ingredients:

        • Grated cucumber
        • Vegan Greek yogurt
        • 3 garlic cloves, minced
        • 1 Tbsp olive oil
        • 1 Tbsp lemon juice or vinegar
        • Fresh herbs (like dill or mint)
        • Sea salt & black pepper

        Instructions:

        1. Grate your cucumbers and squeeze out the excess liquid (save this for the mocktail!).
        2. Mix the grated cucumber with vegan Greek yogurt, garlic, olive oil, lemon juice or vinegar, and chopped herbs.
        3. Season with salt and pepper to taste.

        Serve your tzatziki with fresh veggies, pita, or as a topping for grilled vegetables. It’s a versatile dip that’s always a crowd-pleaser.

        4. Cucumber Mocktail: A Refreshing Beverage

        Don’t let that cucumber liquid go to waste! Use it to make a refreshing and unique mocktail that’s perfect for summer.

        Ingredients:

        • Drained cucumber liquid
        • Juice of 1 lemon
        • 2 Tbsp brown sugar
        • Fresh herbs (like basil mint, lemon thyme, and lavender)
        • Cucumber skin
        • Ice

        Instructions:

        1. In a shaker, combine the cucumber liquid, lemon juice, brown sugar, and a few sprigs of fresh herbs.
        2. Shake well and strain into a glass filled with ice.
        3. Garnish with cucumber skin, decorative herbs, and edible flowers.

        This mocktail is light, refreshing, and a great way to cool down on a hot day.

        The garden offers us so much, and with a little creativity, we can turn that abundance into delicious meals and snacks. I hope these four cucumber recipes inspire you to get creative in the kitchen and make the most of your garden’s bounty. Remember, every part of the vegetable can be used, reducing waste and helping you reinvent your meals.

        Happy gardening and happy cooking!

        0
          0
          Your Cart
          Your cart is emptyReturn to Shop