Free Food in the City! A Beginner’s Guide to Urban Foraging + Top 5 Finds

Free Food in the City! A Beginner’s Guide to Urban Foraging + Top 5 Finds

Have you ever walked through a city park or along a sidewalk and noticed the abundance of edible plants growing wild around you? I found out about foraging and collecting edible food over the past years, and I couldn’t believe how many kinds of wild food you can find anywhere you go, even in a city like London!

Since I did my first foraging course, I learned to notice things that I used to ignore when walking on the street and the importance of being aware of your surroundings. I learned to slow down, pause, and look.

Everything can be found in the supermarket nowadays, so most people don’t get the chance to learn how food is grown and where it comes from.

Foraging for food is a time-honored tradition that brings us closer to the land and the origin of food.

5 things that you can forage even if you live in the middle of the city

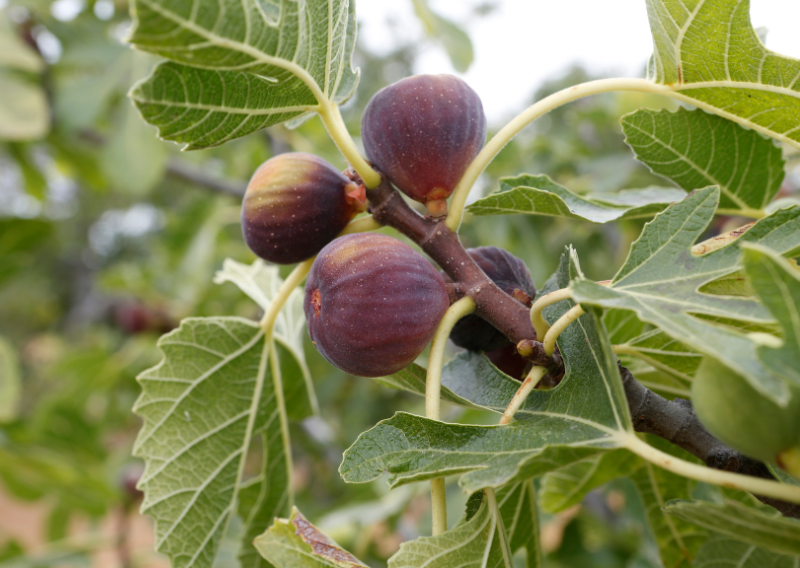
1. Figs – Figs are a delectable fruit with a rich, honey-like sweetness and a soft, chewy texture but they are not the only edible part of the plant. The leaves are also edible and they taste like coconut. They’re great for diabetes, high cholesterol, and skin conditions.

2. Ginkgo biloba- Produces stinky fruits but the leaves have a lovely citrusy and nutty flavor making them a great addition to salads. They also help improve cognitive function and circulation.

3. Bay leaves- They are commonly found in parks. They add flavor to soups, stews, and sauces, enhancing the overall taste of your meal. I usually dry the leaves so I can use them for pickling or cooking. hey are also believed to aid in digestion and have anti-inflammatory properties.

4. Pineapple weed- They commonly grow in disturbed areas and their aromatic, pineapple-like flavor adds a unique twist to your dishes. They also help relieve anxiety and insomnia.

5. Wild Plums- They can be found all over many parks. Their intense sweetness and tanginess make them a delightful addition to jams, pies, and sauces. They are full of fiber, and vitamin A and great for bone health.

    Why Foraging (Even In The City) Is Worth To Do

    • Connecting with Nature in Unexpected Places- Foraging in the city offers a unique opportunity to connect with nature in unexpected places. It encourages us to slow down, observe our surroundings, and appreciate the natural world, even in the middle of concrete and buildings.
    • Embracing Sustainability and Local Food- Foraging promotes sustainability by encouraging the use of local, wild foods that require no pesticides, herbicides, or fertilizers to grow. By foraging in the city, you’re reducing your carbon footprint by sourcing food locally and reducing food waste.
    • Rediscovering Lost Flavors and Nutrients- Many wild edibles are nutrient-rich, often containing higher levels of vitamins, minerals, and antioxidants than their cultivated counterparts. Foraging allows us to rediscover these lost flavors and nutrients, adding variety and depth to our diets.
    • A Sense of Adventure and Discovery- Foraging is an adventure, a treasure hunt in the midst of our daily lives. It challenges us to step out of our comfort zones, try new things, and embrace the unexpected

    Foraging in the city is not just about finding free food; it’s about exploring, learning, and connecting with the world around us…It’s worth doing and I promise that you’ll enjoy this journey.

    Happy foraging!

    How To Make Homemade Porridge Using Amaranth Flower From Your Garden

    How To Make Homemade Porridge Using Amaranth Flower From Your Garden

    Did you know that you can make a homemade porridge by using a flower that you can grow in your garden? Amaranth (Amaranthus Viridis) is an ancient grain really similar to quinoa and a staple of the ancient Aztec diet with many different benefits. It’s considered a superfood with high protein, gluten-free, fiber, and much more! It is extremely easy to grow in the garden and I usually interplanted it in my tomato bed or with courgette and peppers.

    The plant grows pretty tall (4-6 feet) and it comes in different colors like deep red, gold, and green which not only gives a lush look to your garden but also attracts predatory insects to keep away pests from your garden.

    When the season ends, I simply cut it at the base, and leave the roots in the ground so you don’t disturb the macro and microorganisms that will decompose the roots and hang it upside down to dry.

    How To Make Porridge Using Amaranth Flower

    RECIPE:

    • 100g Amaranth
    • 500ml Almond milk
    • 4tsp Flax seed/ chia seed
    • 2tbsp Coconut flakes

    GARNISH:

    • Berries
    • Nuts
    • Dried fruits
    • Seeds
    • Maple syrup

    Step-By-Step Procedure:

    1. Hang amaranth upside down until dry then separate the seeds
    2. Blow air to remove debris
    3. Transfer the amaranth seeds into a pot and add flax seeds or chia seeds
    4. Add coconut and oat milk
    5. Bring to heat and stir for 15 minutes until the desired thickness

    Health Benefits of Amaranth Flowers

    • Rich in antioxidants: Amaranth flowers are packed with antioxidants, which help neutralize harmful free radicals in the body, reducing the risk of chronic diseases.
    • High in vitamins and minerals: These flowers are a great source of vitamins A, C, and E, as well as minerals like calcium, iron, and magnesium, essential for overall health and well-being. 
    • Supports heart health: Amaranth flowers contain a high amount of dietary fiber and phytosterols, which help in lowering cholesterol levels and reducing the risk of heart disease.
    • Boosts immunity: The presence of vitamins and minerals in amaranth flowers helps boost the immune system, keeping common illnesses at bay.
    • Aids digestion: The fiber content in these flowers promotes healthy digestion and prevents digestive issues like constipation


    Other Ways You Can Incorporate Amaranth Flowers Into Your Meal and Diet

    Edible petals: The vibrant petals of amaranth flowers can be used as a colorful garnish in salads, soups, and desserts, adding a pop of color and a mild, earthy flavor.

    Tea: Steeped amaranth flowers make a delicious and soothing tea that can be enjoyed hot or cold, offering a refreshing and nutritious beverage option.

    Infused honey: Infusing honey with amaranth flowers adds a unique floral flavor to the honey, perfect for drizzling over desserts or adding to tea.

    Syrup: A syrup made from amaranth flowers can be used to sweeten beverages or desserts, providing a natural and flavorful alternative to sugar.

    Amaranth flowers are really a gem that’s why we make sure that we always have it in our garden. They are relatively easy to grow, as they are adaptable to various soil types and climates. Who could’ve thought that such a pretty flower could bring loads of health benefits and be eaten as a delicious meal like porridge?

    Try this easy recipe and enjoy a delicious meal at home.

    Happy cooking!

    Level Up Your Breakfast: Homemade Pancakes with Flavorful Herbal Syrup (Simple Recipe)

    Level Up Your Breakfast: Homemade Pancakes with Flavorful Herbal Syrup (Simple Recipe)

    One of our favorite breakfasts is homemade pancakes served with hot tea. It’s such a great feeling to start the day eating this meal. But do you know what makes it even better? If you top it with herb syrup! There’s something deeply fulfilling about preparing a meal that is not only delicious but also shows your hard labor in the garden. Aspiring gardeners or those wishing to expand their planting knowledge will find this combo not only delicious but also extremely rewarding.

    Helichrysum italicum is an annual plant with edible flowers and leaves! It is called the curry plant for the strong smell of the leaves, but it also reminds me of a mix of wormwood and sage with hints of cinnamon. It has incredible medicinal properties, helping the skin regenerate, quickly getting rid of scars, and providing antimicrobial benefits. For this blog, we will use this incredible herb to make syrup.

    Making Your Own Herbal Syrup

    Herbs Syrup Recipe

    • Orange peel
    • 500 ml Water
    • 30 g flowers or leaves
    • 250 g Sugar

    Procedure

    1. Put the orange peel into a large pot with 500ml water
    2. Bring to boil and simmer orange peel and herbs for 10 minutes
    3. Remove the herbs and peel
    4. Add 250g sugar to the boiling water and make sure to mix it properly
    5. Remove from heat and let it steep for another 15-20 minutes
    6. Store in the fridge once cools

    Note: Any herb could be used to make this delicious syrup which you can use for up to 2-3 weeks when using fresh herbs.

      Bonus Recipe

      Homemade Pancake

      • 3 Cups of coconut milk
      • 1/4 Cup of coconut oil
      • 1 Cup of rice flour
      • 1/4 Cup of corn flour
      • 1/4 Cup of fine cornmeal
      • 1/4 Cup of coconut flour
      • 2 Tbsp flax seed
      • 1 1/2 Tsp baking powder
      • 2 Tbsp cane sugar
      • 1 Pinch of salt

      Procedure

      1. Mix dry ingredients such as 1 Cup of rice flour, 1/4 Cup of corn flour, 1/4 Cup of fine cornmeal, 1/4 Cup of coconut flour, 2 Tbsp flax seed, 1 1/2 Tsp baking powder, 2 Tbsp cane sugar, and 1 Pinch of salt
      2. Add 3 cups of coconut milk and 1/4 cup of coconut oil
      3. Mix well using a hand mixer until you achieve a thick consistency like a pancake mixture
      4. Heat a non-stick skillet over medium heat and lightly grease with olive oil
      5. Pour about 1/4 cup of batter onto the skillet for each pancake. Cook until bubbles form on the surface, then flip and cook until golden brown on both sides.

      Homemade pancakes with herbal syrup are more than simply a great breakfast alternative; they celebrate your gardening work and demonstrate the benefits of using fresh products. Making your own herbal syrup provides a healthier, more sustainable, and more tasty alternative to store-bought choices.

      I hope we all consider planting a few more herbs in the hopes that they’ll soon change our pancakes into something genuinely unique.

      Happy gardening and cooking!

      The Ultimate DIY Garlic Mustard and Mayo: Elevate Your Kitchen Game

      The Ultimate DIY Garlic Mustard and Mayo: Elevate Your Kitchen Game

      Have you ever tried making your own condiments from scratch? Me and my fiance, Iasmina (@lajatatto) loves garlic mustard and mayo so much. The flavor is so unique and it compliments many of our favorite dishes such as sandwiches and salads. The beauty of making things from scratch is that you appreciate it much more but also they won’t have any extra chemicals or preservatives. You’ll connect with what you eat, and there’s something deeply satisfying about knowing exactly what’s in your food. Today, I’m excited to share with you how to make your very own plant-based garlic mustard and mayo. It’s super easy and quick!

      DIY Garlic Mustard

      Ingredients

      • 1 cup yellow mustard seeds
      • 2 cups filtered water
      • 1/4 cup distilled wine vinegar
      • 1/2 teaspoon salt
      • 1/4 teaspoon turmeric
      • 1/4 teaspoon paprika
      • 1/4 teaspoon garlic powder
      • 1/4 teaspoon onion powder
      • 1/9 teaspoon ground cinnamon powder
      • 1 tablespoon agave

      Step-by-Step:

      1. Start by making flour out of the mustard seeds. You can use a mortar, blender, or coffee grinder. This step is essential to get that smooth texture we all love.
      2. In a bowl, mix the dry ingredients including ground mustard seeds, salt, turmeric, paprika, garlic powder, onion powder, and cinnamon powder.
      3. Add the water and agave to the dry ingredients. Bring to a boil over low heat for about 10 minutes. Then, add the vinegar and let it boil for 2 more minutes.
      4. Let the mixture cool and then store it in an airtight jar. You can keep it in the fridge for up to 3 months.

      DIY Mayo

      Ingredients:

      • 1 cup soya milk
      • 1 cup olive oil
      • 1 teaspoon salt
      • 2 tablespoons lemon juice
      • 1 tablespoon mustard
      • 1 tablespoon maple syrup
      • Optional: 1-2 garlic cloves and 2 extra tablespoons olive oil for a thicker, garlic-infused version

      Step-by-Step:

      1. Throw all the ingredients into a blender and blend until smooth. (Optional: to make a garlic mayo add 1-2 garlic cloves and 2 extra tbsp olive oil to make it thicker.)

      2. Transfer your mayo into an airtight container and store it in the fridge. It should last up to 1 week.

      3. Feel free to get creative! Add some herbs or a pinch of chili for an extra kick.

      Get Creative In The Kitchen

      What I like the most about the garlic mustard and mayo is their versatility. You can add a pinch of cayenne if you want a hot mustard. If you like some herby mayonnaise, just mix it with some fresh dill or parsley. The possibilities are endless, and the results always turn out delicious. You just have to be creative!

      Aside from the delicious flavors, preparing your own condiments has health benefits. You choose the ingredients, ensuring that everything is fresh and natural. Believe me, once you start preparing your own condiments, you’ll never go back to store-bought. Let’s elevate our dishes, one DIY condiment at a time!

      Happy cooking!

      Simple Steps To Grow Your Potatoes In Container (Home And Beginner Friendly!)

      Simple Steps To Grow Your Potatoes In Container (Home And Beginner Friendly!)

      Growing potatoes using containers is one of my favorite things! My mum has been a seamstress for more than 3 decades and she taught me how to make grow bags for my garden. It’s super easy if you follow the right steps. They are super productive and take up a really low space which makes them suitable for almost any growing space.

      Potatoes are delicious and also a staple in our kitchen. We love eating potatoes. From soups to plant-based pizza, and even roasted potatoes, they really make every meal enjoyable.

      Why Grow Potatoes in a Container?

      Growing your own potatoes ensures they are free from harmful pesticides and chemicals, providing you with the healthiest option possible. Plus, container gardening allows you to control the soil quality and watering, leading to a better yield. You can expect small new potatoes as early as 10 weeks but on average, potatoes should mature in 70 to 90 days depending on the variety.

      Getting Started With What You’ll Need And Step-By-Step Procedure:

      Grow bags and Potatoes

      • 100% cotton fabric material or similar
      • Sewing machine
      • Compost mix
      • Chit potatoes
      • Mulch (straw or similar)

      Kindly follow these simple steps

      1. Choose your tomatoes
      2. Get a 100% cotton fabric material or similar
      3. Measure and cut it rectangularly according to the size that you deem fit
      4. Fold it in half and sew the open side
      5. Sew an X at the bottom then turn it upside down
      6. Fold and sew the upper border
      7. Add compost mix and fill up your grow bag
      8. Chit potatoes and make some holes
      9. Add worm casting (optional)
      10. Add one potato to each hole and cover with compost
      11. Mulch with straw and water it

      Note: Chitting potatoes means forcing them to sprout before they are in the ground. Place them in an egg carton with a pointy side facing down and round side up. Keep them in a cool, bright area until they sprout.

      As a reference, you can plant 1-2 potatoes in 5 gallons, 2-4 potatoes in 10 gallons, and 4-6 potatoes in 15 gallons.

        Health Benefits of Potatoes

        Potatoes are often misunderstood as merely starchy comfort food, but they offer significant health benefits such as…

        • Rich in Nutrients: Potatoes are packed with vitamins C and B6, essential for immune function and brain health.
        • Potassium Powerhouse: They contain more potassium than bananas, helping to maintain healthy blood pressure levels.
        • High in Fiber: Potatoes, especially with the skin on, provide a good amount of dietary fiber, aiding digestion and promoting a healthy gut.
        • Antioxidant-Rich: Potatoes contain antioxidants like flavonoids and carotenoids, which help protect your cells from damage.

        Harvesting Your Potatoes

        The nicest part of growing potatoes is the harvest. You’ll know it’s time when the foliage begins to yellow and die back, which normally occurs around 10-12 weeks. To harvest, simply empty the container and sift through the soil to get your potatoes. Please be gentle to prevent bruising them.

        Once collected, keep the potatoes in a cold, dark area. They can survive several months if properly preserved. And if you’re ready to enjoy them, the options are endless. From baked potatoes to homemade fries, homegrown potatoes will taste fresher and more flavorful than store-bought potatoes.

        Happy growing!

        0
          0
          Your Cart
          Your cart is emptyReturn to Shop