How To Make Your Own Medicinal Oil Using Lavender: Easy and Simple Steps

How To Make Your Own Medicinal Oil Using Lavender: Easy and Simple Steps

If you’re also like me and love the comfort and smell that infused oils bring, you’ll love what I’m about to share with you. I saw this great tip about making my own oil from @deannacat3, and I tried it straight away. It could be done with many different flowers, and it will have different benefits depending on the flower!

In my case, I prefer lavender. Lavender is a great plant, and we love it so much. When you enter the gate of our garden, you’ll immediately see and smell the lavender. Throughout the year, we are planting different varieties, and we have a massive of them. We harvested so much last year that we’ve managed to do lavender as salt, dried bouquets to keep in the bedroom (it helps with sleeping), tea, small bags to put inside the wardrobe (it gives the room and the clothes a very nice fragrance), and of course a medicinal oil.

In this blog, let’s talk about infused lavender oil, its benefits, and how to make your own.

Why Make Your Own Lavender Oil?

By doing your own, you control the quality and ensure a chemical-free product straight from your garden to your bottle. Plus, it’s a delightful way to extend your gardening experience beyond the growing season, preserving the essence of summer blooms for year-round use.

Health Benefits of Medicinal Oil

Infused Lavender Oil Relieves Stress and Anxiety:
Lavender’s soothing scent has been scientifically proven to reduce stress and anxiety levels, promoting relaxation and better sleep quality.

Aids in Pain Relief:
When applied topically, lavender oil can help relieve headaches, muscle aches, and joint pains-  thanks to its anti-inflammatory properties.

Promotes Skin Health:
Its antimicrobial and antioxidant characteristics make lavender oil a natural remedy for various skin conditions, including acne, eczema, and minor burns.

Supports Respiratory Health:
Inhaling lavender oil vapors can help relieve respiratory issues like colds, coughs, and sinus congestion, making it a go-to during the cold season.

Enhances Mood and Cognitive Function:
The aroma of lavender oil has mood-boosting effects, enhancing cognitive function and promoting a sense of well-being.

    How To Create Your Own Medicinal Oil Infused Lavender Oil

    You would need 1-2 cups of dried organic lavender flowers. 1 bottle of your favorite organic oil and 1 glass jar. Optional: you can also mix a few chamomile flowers dehydrated for 24 hours at low temperatures.

    1. Hang dry or dehydrate lavender at low temperature. Once fully dry, separate the lavender buds from the stem.
    2. Fill a glass container at least ¾ full of dried lavender flowers or buds.
    3. Pour your organic oil of choice over the dry lavender, filling the container enough to cover the flowers.
    4. Place the jar in a sunny warm location to infuse for at least one week, or up to 3 weeks. Shake once in a while as the flowers might float to the top.
    5. After 3 weeks, strain the lavender flowers and reserve the oil. (I use a cheesecloth so I can squeeze every drop.)
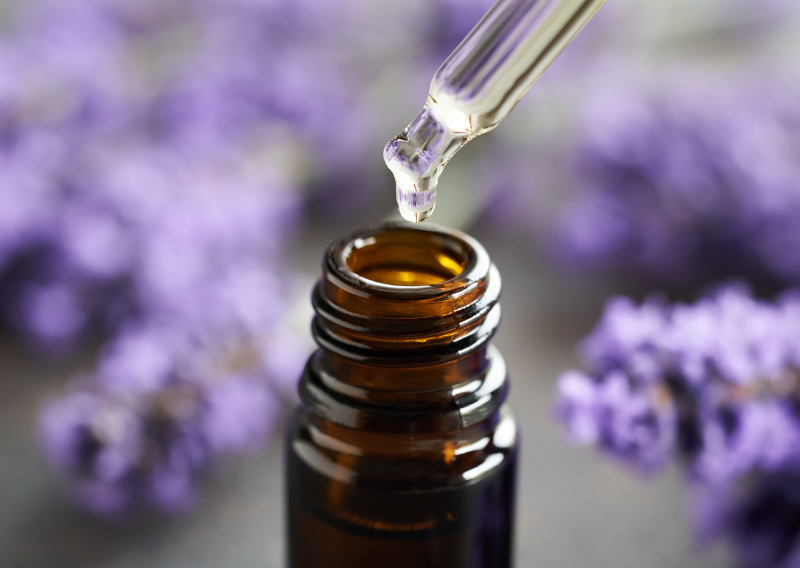
    6. Transfer the oil to amber glass bottles with a dropper to preserve it and use it when needed.

    Lavender is great and it’s our personal favorite. I suggest that you also plant them in your garden because it’s a super cool plant to have around. They have a beautiful color and different shades, and the aroma when you enter the garden is all over the place. Plus the fact that you can use them in so many ways is amazing. So, why not plant lavenders and try this medicinal oil-infused lavender oil at home?

    Happy growing!

    5 Easy Steps To Make Your Own Mushroom Extract At Home

    5 Easy Steps To Make Your Own Mushroom Extract At Home

    I’ve recently discovered something that’s been really working for me, and I wanted to share it with you. We’ve been trying out mushroom tinctures, and they’ve been quite beneficial for our overall health and well-being.

    One of my favorites is the Reishi mushroom, which is also known as the mushroom of immortality because of its potential to promote longevity and vitality. You can find these mushrooms in the wild or grow them at home with a grow kit.

    It’s a great experience for us to see the benefits of mushroom extract, so I thought I’d share this interesting find with you.

    Incredible Health Benefits Of Mushroom Extract:

    • Immune Support: It’s loaded with compounds called beta-glucans, known to amplify your immune system. By incorporating mushroom extract into your gardening routine, you’re not just nurturing your plants, but also fortifying your body’s natural defenses.
    • Antioxidant Powerhouse: They’re packed with antioxidants that help fight free radicals and reduce oxidative stress.
    • Stress Relief: In today’s fast-paced world, stress is practically unavoidable. Fortunately, some mushrooms, like reishi, contain adaptogens, aiding your body to cope with stress.
    • Enhanced Cognitive Function: Certain mushrooms are celebrated for their brain-boosting properties. They contain naturally occurring compounds that are believed to interact with nerve growth factors in the brain, potentially supporting memory, focus, and overall mental clarity.
    • Energy Boost: Mushroom extracts can give you a natural energy lift without the jittery side effects of caffeine, making them the best option for everyone.
    • Digestive Health: Mushrooms are fiber-rich and help enhance your digestive health. By feeding the good bacteria, mushrooms help create a balanced gut microbiome, the community of microorganisms in our digestive tract.

    Ingredients To Make Your Own Mushroom Extract:

    • Reishi mushrooms
    • High-proof alcohol (at least 40%) or vodka
    • Glass jar
    • Cheesecloth
    • Water

    Follow These Easy Steps:

    1. The first step to making a tincture is to chop the mushrooms and break them into small pieces. Now place them into a clean jar and cover them with high-proof alcohol.
    2. Secure a lid and shake them every day for one month, as much as you can! After 1 month, strain the liquid using a cheesecloth into another jar and keep the mushrooms.
    3. In a large pot, pour 2 liters of water and bring it to a boil. Add your mushrooms and let them simmer for about 2 hours.
    4. After 2 hours, the water should reduce a lot (around 300–400 cl) and once it has cooled down, you can strain it using a cheesecloth.
    5. Compost the reishi and keep the strained water. Combine the water with your alcohol and store it in a dark cabinet.

    The steps are pretty easy, and if you want to try, you can definitely try this at home. We add the mushroom extract to our daily routine, and the health benefits are truly remarkable. It boosts our immune system and even improves our sleep. It’s a great help for us, and I hope it’ll help your health too.

    8 Simple Steps To Clone Herbs At Home

    8 Simple Steps To Clone Herbs At Home

    Do you ever realize that you usually run out of fresh herbs when you need them the most? We’ve all been there. And if you’re thinking that having a garden is the only solution, then you’re wrong about it. If you don’t have a garden but you still love using fresh herbs in your kitchen, you can easily buy them once and have an unlimited supply using just the space of a windowsill! 

    Almost any herb could be easily cloned using the method that I’ll show you, and it will provide an unlimited supply of fresh herbs! I built extra shelving to maximize the potential of my windowsill space, and you can just use plaster to fix the holes if you move out of a rented property.

    What Herbs Can You Clone?

    Many common herbs can be successfully cloned, and they root quite easily. Here’s a list of some favorites:

    • Basil: This kitchen staple roots quickly and thrives indoors. Cut above one of the nodes and remove any lower leaves
    • Parsley: Both flat-leaf and curly varieties can be cloned and will grow vigorously. Cut at the base of the plant
    • Mint: Known for its invasive nature, mint roots readily and will flourish in its own pot. Cut at the base and remove the lower leaves
    • Woody herbs (rosemary, thyme, etc): Thyme is a hardy herb that is a must-have for savory dishes and roots well from cuttings. Rosemary is a bit slower to root, but worth the wait for its robust flavor. Take cutting from new green growth and remove lower leaves for both of them.

    The Magic of Cloning Herbs

    Cloning store-bought herbs is a fantastic way to ensure you always have fresh herbs on hand. It’s economical, sustainable, and surprisingly easy. Here’s a step-by-step guide to help you get started.

    1. Buy herbs from the local store (please note that almost any herb works)
    2. Cut above regrowth and remove lower leaves
    3. Pour plain water into a glass and add your cuttings
    4. There will be roots with plain water 10–14 days later
    5. Get a terracotta pot, then add organic compost and vermiculate
    6. Plant your rooted cutting and water them
    7. Cut the right (or desired) size of timber
    8. Potted plant on top and place cuttings in water at the bottom

    NOTE: replace the water of your cuttings every 3 days, buy a bag of organic compost, or make your own – I made a blog about it and you can read it here.

    Caring for Your Cloned Herbs

    Now that your herbs are planted, care is key to their success. Place the pots in a sunny spot, ideally receiving 6-8 hours of sunlight per day. In my case, I placed mine on our kitchen’s windowsill. Water regularly, keeping the soil moist but not waterlogged. As your herbs grow, pinch back the tips to encourage bushier growth and prevent them from becoming leggy.

    Cloning store-bought herbs is a practical way to enhance your gardening skills and improve your dishes. It’s an accessible project for both aspiring gardeners and seasoned gardeners. With a little patience and care, you can transform a single herb purchase into a flourishing mini garden that provides fresh, flavorful ingredients all year round. So, grab those scissors and get cloning. Just follow the steps above, and you’ll soon have thriving and healthy herbs.

    Happy growing!

    Radish Growing Guide: From Seed to Harvest in No Time!

    Radish Growing Guide: From Seed to Harvest in No Time!

    The radish, often undervalued and disregarded, is a gardener’s dream. I recently began my radish planting quest and fell in love with two separate varieties: Chinese large radish and Spanish black radish. The diversity and distinct flavors of many radish varieties introduced me to a whole new world of culinary ideas.

    Radishes are extremely adaptable, flourishing happily in various weather conditions throughout the year. Their extraordinary versatility, combined with their quick growth cycle, makes them an ideal addition to any home garden.

    Health Benefits of Radish

    Rich in Nutrients:
    Radishes are low in calories but high in vitamins C, K, and B6, as well as minerals like potassium and manganese. They also contain antioxidants like catechin, which can help fight free radicals in the body.

    Digestive Aid:
    The fiber content in radishes can help regulate digestion and promote a healthy gut. They are also known to stimulate bile production, which aids in digestion.

    Immune Boost:
    The high vitamin C content in radishes can help boost your immune system, protecting you from common illnesses like colds and flu.

    Hydration:
    Radishes have a high water content, making them a great way to stay hydrated, especially during hot summer months.

    Weight Management:
    Due to their low calorie and high fiber content, radishes can help you feel full for longer, aiding in weight management.

    Planting Your Radish

    When it comes to planting your radish seeds, you can directly sow them outdoors. A good rule of thumb involves planting them approximately 1 inch deep and apart. However, this can slightly vary depending on the type of radish you’re growing.

    For instance, the Daikon radish needs a bit more room to spread its roots and flourish, so you might want to space them a tad more than others.

    (Extra tip: If you grow radishes next to cucumbers, it will keep them from getting woody when they grow.)

      Radish: A Kitchen Delight

      Now, let’s talk about flavor. Radishes bring a refreshing crunch to any dish, thanks to their high water content. One of my absolute favorite ways to enjoy radishes is in a bowl of steaming noodles.

      The fresh, crisp bite of radish adds a delightful contrast to the soft, warm noodles. It truly is a match made in culinary heaven! You can also pickle them for a tangy snack or slice them thinly and use them as a crunchy topping for your avocado toast.

      Caring For Your Radish Plants

      As for caring for your radish plants, remember – they like their soil like a good sponge cake – moist but not soaking wet! Overwatering can lead to the plant focusing its energy on producing leaves rather than the radish. So, keep an eye out for that optimum moisture level. They also have a secret preference – they absolutely love the shade! Unlike mo

      Radishes may be small, but they pack a big punch when it comes to flavor and nutrition. Easy to grow and delicious to eat, radishes are a fantastic addition to any garden. So, next time you’re thinking of adding a new vegetable to your garden, I hope you’ll consider the radish – the shady veggie of the garden.

      Happy growing!

      Unlocking the Secrets: How Tomato Seeds Transform into Delicious Plants

      Unlocking the Secrets: How Tomato Seeds Transform into Delicious Plants

      I absolutely adore tomatoes. There’s something so satisfying about growing them in our garden. From the moment I plant the seeds, to watching the vines flourish under the sun, each stage is a reminder of nature’s beauty and bounty. We love to pick them up, they have many amazing colors and different varieties. In our garden, we don’t just grow red tomatoes. We also plant different and special varieties, such as kryptonite tomatoes, dark galaxy tomatoes, and yellow heirloom tomatoes.

      Tomatoes never fail to impress us, as they’re incredibly versatile in the kitchen. We use them in almost everything, and they’re a must-have in our garden! From tomato sauce and passata to tomato paste and powder, they add flavor to countless dishes. We also enjoy dehydrating them to make sun-dried tomatoes in olive oil.

      They’re tasty, healthy, versatile, and most of the gardener’s favorites. However, storing and using their seeds for the next planting season isn’t as simple as plucking the fruit and sowing the seeds directly into the soil. But don’t worry, I’ll guide you through the process.

      Choosing the Right Tomato

      It all starts with selecting a fully ripe and ready-to-harvest tomato. When you slice open a tomato, there’s a gelatine inside that acts as a sprout inhibitor. The gelatine protects the seeds, and it makes sure the seeds don’t sprout inside the fruit. Fascinating, right?

      Nature’s Own Germination Process

      Here’s how nature intended it: a ripe tomato falls to the ground, but the ground temperature is usually too cold for immediate germination. Plus, the protective gel around the seeds helps ensure they don’t jump into action too soon. But come spring, with the warmer temperatures, and the long-gone gel, the seeds bounce back into life and start to germinate.

      Mimicking Nature’s Way

      You can recreate this natural process at home with a few easy steps.

      • Just scoop the seeds and gelatin in a cup.
      • Cover the jar with cling film and let it sit for about 2-3 days, depending on the temperature.
      • Mix it twice a day to avoid mold but if you get any, don’t worry, as it won’t affect the seeds. After 2-3 days, your seeds should be sinked to the bottom. Good seeds always sink to the bottom, but a few varieties might just float.
      • Drain and wash your seeds and let them dry on a paper plate. Don’t use kitchen towels, or they will stick to it.
      • Add them to a paper bag when they are completely dry and use them the next season!

      The Health Kick of Tomatoes

      The perks of tomatoes are really something to take note of. They’re nutritional fruit, loaded with vitamins, minerals, and antioxidants.

      Tomatoes get their vibrant red color from lycopene, a potent antioxidant, which may reduce the risk of heart disease and certain types of cancer. Tomatoes are also abundant in vitamin C for a robust immune system, potassium for regulating blood pressure, folate for cell growth and repair, and vitamin K for healthy bones.

      Tomato seeds are nutritional gems, too. They are often dismissed and discarded, but they’re a great source of fiber, promoting digestive health and potentially lowering cholesterol levels. Moreover, they supply protein, healthy fats, and a lot of vitamins and minerals.

      So, whether you’re new or experienced in gardening, I highly recommend planting tomatoes in your own garden. Not only will you enjoy the satisfaction of growing your own food, but you’ll also savor the unmatched flavor of homegrown tomatoes in every bite.

      Happy growing and eating!

      0
        0
        Your Cart
        Your cart is emptyReturn to Shop