How To Maximize Your Space Using the Square Foot Gardening Technique With 5 Easy Steps

How To Maximize Your Space Using the Square Foot Gardening Technique With 5 Easy Steps

A quick tip to maximize your harvest in a small space using the square foot gardening technique!

I want to share a little gem of wisdom that I stumbled across during a recent chat with my friend Jacks Patch, @jacks_patch. It’s a fantastic solution for those of us who love to garden but are limited by space – the art of companion planting using square-foot gardening. This gardening method promises to maximize your yield, even in the smallest of spaces. So, let’s dig in!

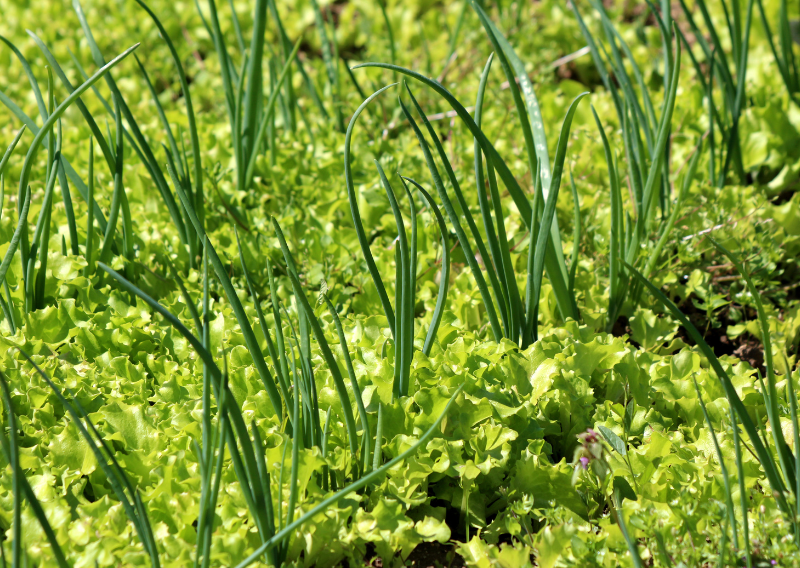
Imagine you have a small patch of your backyard or balcony flourishing with fresh, organic lettuce and spring onions. It’s not only possible but also quite easy with this simple yet effective gardening hack. The secret? Planting your lettuce and spring onions close together in a specifically measured space.

The benefits of this technique are numerous. Firstly, these two make great garden mates. Secondly, the strong aroma of spring onions acts as a natural pest repellent, keeping your leafy greens safe (yup, it will repel some insects!). And finally, this layout ensures that every inch of your grow bed is used to its maximum potential.

The Layout and Planting Technique:

The technique is quite straightforward: define a 20-inch row and plant every 10×10 inches apart. To visualize this, think of a 10-inch square. At each corner, plant a lettuce plug, leaving the center grid section for a spring onion.

Why this arrangement, you ask? Well, as your lettuce starts to flourish, each spring onion won’t be overshadowed by the circumference of the lettuce. This leaves them ample space to grow tall and strong right in the middle.

This innovative layout not only helps fill your garden bed with thriving vegetables but also helps retain soil moisture and maintain the perfect temperature for growth. Remember, every square foot counts, and if we maximize the biodiversity within it, both your garden and soil will reap the benefits!

    Here’s a Step-by-Step Guide to Companion Planting Using Square Foot Gardening:

    1. Prepare your soil: Start with good compost. Spread it evenly across your grow bed. Nutrient-rich soil is the cornerstone of any successful garden, and this is no exception.

    2. Establish rows: Using a spade, create a row that’s 1-2 inches thick and 20 inches long.

    3. Plant traditionally: Now, it’s time to plant your vegetables. Remember to maintain a distance of 10×10 inches between each plant.

    4. Alternate your plugs: To follow the square foot model, alternate between lettuce and spring onions. The diversity in your plant life will help keep the soil healthy and nutrient-dense.

    5. Follow the square foot model: Place a lettuce plug at each corner of a 10×10 inch square. Plant a spring onion plug in the center. This placement allows every plant to flourish without overcrowding.

    Tip: You can plant red, green, or brown lettuce together with the onions!

    If you didn’t know, lettuce is not just great in salad! You can also use them as a wrap, in soup, or even in smoothies.

    By following this method, your garden will be bursting with fresh produce in no time. (Pro tip: you can also make different raised beds using this same technique). This is a testament to the fact that even in the smallest spaces, with smart planning and a little bit of elbow grease, we can have a garden to be proud of.

    Happy growing!

    Easy Tips To Learn About Courgettes And Identify The Male And Female Flowers

    Easy Tips To Learn About Courgettes And Identify The Male And Female Flowers

    Did you know that courgettes are not only about the fruit but also the flowers they bloom? Yes, it’s true – these plants have a whole floral story to tell!

    Courgettes are the perfect vegetable for beginners and definitely one of my top 5 things to grow every year. We only have a small garden in London, and if you have a small space too, you can grow them vertically. I know that it’s a bit strange to see courgettes growing vertically, but it’s possible. You can save a lot of space, and they look cute too! If you grow too many plants, then you can have many baby courgettes because they keep producing so much, and if you plant a few varieties, you can wait for the courgettes to grow bigger. Every part of the plant is edible, and the harvest is so rewarding!

    As much as we love courgettes, I should say that the flowers are incredible too. There are times that I grow a few plants just to harvest and eat the flowers. They are a versatile ingredient that can be used in a variety of dishes. They can be stuffed with a flavorful filling, fried, added to soups and stews, or simply sautéed with garlic and olive oil for a quick and delicious side dish. Their subtle flavor is often compared to that of the courgette itself, making them a perfect complement to many dishes.

    The Blossoms: Male and Female Flowers

    To grow courgette flowers, simply plant courgette seeds or seedlings in a sunny spot with well-drained soil. Keep the plants well-watered and fertilized, and they will reward you with an abundance of beautiful blooms. Harvest the flowers in the morning when they are fully open for the best flavor and texture.

    You probably already know, but for those who don’t – courgette plants are a little bit like us, in the sense that they have both male and female parts. But here’s the fun part: they produce two types of flowers – males and females.

    Male flowers are usually the first ones to bloom. They sport narrow flower stems and are bursting with pollen that attracts pollinators. The male flowers aren’t just pretty; they taste amazing too! Try them stuffed with mozzarella and fried – a dish you never knew you needed.

    Female flowers typically make their debut a little later, after the insects have been enticed by the male flower. These ladies are easily recognizable by their swollen stem, or ovary, which may even look like a mini version of the mature fruit. And if they’ve been successfully pollinated, fruit production begins!

    The Art of Hand Pollination

    What if your courgette plant isn’t producing as much fruit as you’d like? It could be time to practice hand pollination and become the perfect matchmaker for these beauties. Grab a brush, collect some pollen from the male flowers, and delicately transfer it to the females’ pistils. Voila! You’ve just helped nature along by ensuring that you have plenty of courgettes for your future dinners.

    Quick Reminder

    I know that it’s really tempting to pluck those beautiful flowers to make a delicious meal, but remember that balance is key. Harvesting too many blossoms can leave your plant without enough pollinators to set fruit. So, be mindful, enjoy a few blossoms for your kitchen creations, and leave some for nature to work its magic.

    So, the next time you eat grilled courgettes or a crispy fried flower, remember the journey that brought them to your table. And maybe in that moment of thankfulness, you’ll experience a stronger connection to nature and the delectable gifts it offers.

    Happy gardening and bon appétit!

    Edible Flowers & Pest Control: The Ultimate Guide to Nasturtiums

    Edible Flowers & Pest Control: The Ultimate Guide to Nasturtiums

    Nasturtium is one of those plants that every beginner or advanced gardener must have in their growing space! I plant it every season in either pots or corners of the raised beds, and when it gets completely full of pests, I just chop off the plant at the base and dispose of it.

    Yup, they’re the natural pest repellent! Garden pests like green and black flies are attracted to this plant, especially the yellow varieties. They are also known to deter whiteflies, cucumber beetles, and other pests.

    Nasturtium is used as a sacrificial plant because pests will simply infest your nasturtium plant, leaving your main garden crop undisturbed.

    Why Nasturtiums?

    Nasturtiums, known scientifically as Tropaeolum majus, are more than just eye candy. These easy-to-grow plants serve a dual purpose in your garden. Aside from acting as a natural pest repellent and reducing the need for harmful chemical pesticides, they are also completely edible, including flowers, leaves, stems, and seeds. (I’m not a big fan of the peppery flavor but I’m working on it ????)

    The name means “nose twister,” referring to people’s reaction upon tasting the peppery flowers. The seeds were used during World War II to replace pepper. They could also be fermented and they could replace capers!

      Planting Your Nasturtiums

      Planting nasturtiums is easy, making them perfect for new gardeners or those looking to add a low-maintenance yet beneficial plant to their garden. Here’s how you can get started: 

      Choose the Right Spot:
      Nasturtiums thrive in full sun but can tolerate partial shade. Select a spot in your garden that receives at least 6-8 hours of sunlight per day.

      Prepare the Soil:
      Nasturtiums are not picky about soil quality and can grow in poor or average soil. However, they prefer well-draining soil with a slightly acidic to neutral pH. (Quick tip: Amend the soil with compost if it’s too compacted or lacks nutrients.)

      Sow the Seeds:
      Nasturtium seeds are large and easy to handle, making them perfect for direct sowing. Plant the seeds about 1 inch deep and 10–12 inches apart. Water gently after planting to settle the soil.

      Watering and Care
      Keep the soil consistently moist but not waterlogged. Nasturtiums are drought-tolerant once established, but regular watering promotes lush foliage and abundant flowering.

      Watch Them Grow:
      Nasturtiums are fast growers and will start blooming within a few weeks of planting. Enjoy the colorful display of flowers, and watch as beneficial insects are attracted to your garden.

      Harvesting:
      Both the leaves and flowers of nasturtiums are edible. Harvest them as needed by pinching or cutting them from the plant. Regular harvesting encourages more growth and flowering.

      Gardeners, remember that it’s not too late to protect your plants. And whether you’re looking to add color to your garden, repel pests naturally, or enjoy their edible flowers and leaves, nasturtiums are sure to help.

      Follow these simple steps in this blog, and you’ll soon harvest your own sacrificial plant – a great addition and ally in your thriving and growing garden.

      Grow Your Own Delicious and Nutritious Onions: Easy Steps for Beginners

      Grow Your Own Delicious and Nutritious Onions: Easy Steps for Beginners

      We just harvested a lot of onions, and the smell is just incredibly nice! It has always been a staple in our kitchen. It offers loads of health benefits, and it’s also a great addition to any dish. It can be roasted, pickled, caramelized, sliced thinly, or chopped and served raw in salads, sandwiches, dips, or as a garnish for tacos, making them among the most versatile ingredients.

      Today, we will explore why planting onions is a must in your garden and how it could benefit your health.

      Why Plant Onions In Your Garden?

      Onions are incredibly easy to grow, making them perfect for beginner gardeners. They require minimal maintenance and can thrive in a variety of soil conditions, making them a reliable crop year after year. Whether you have a sprawling garden or just a few pots on your balcony, onions can fit into any space.

      One of the best things about growing onions is their versatility in the kitchen. When you grow your own onions, you can harvest them at their peak freshness, making them extra tasty for your meals.

        How to Grow Onions

        • Start by selecting a sunny spot in your garden with well-draining soil. (Onions prefer slightly acidic soil, so consider testing your soil’s pH before planting.)
        • Plant onion sets or seeds about 1 inch deep and 4 inches apart, and keep the soil evenly moist throughout the growing season. (Onions are ready to harvest when the tops turn yellow and start to fall over.)
        • Pull them up gently and let them dry in a warm, well-ventilated area for a few days before storing them in a cool, dry place.

        A few easy tips to harvest onions and how to make them grow bigger from our friend, @jacks_patch

        To harvest onions, you just need to use one hand and a tool like a fork so you can lift the bulb and, at the same time, pull from the green stem and avoid breaking the roots or the shoots.

        Alternatively, you can use a hori hori knife to cut around the base of the plant and pull it out pretty easily.

        Cut the green shoots when the onions are small. This will redirect the energies that were going into the flower to the bulb and make it swollen and grow bigger!

        Adding onions to your garden is a no-brainer. They’re easy to grow, delicious, and offer a wide range of health benefits. Whether you’re an experienced gardener or just starting, planting onions is a simple and rewarding way to enhance your garden and your health.

        Happy growing!

        How To Make Your Own Homemade Tortillas Using Masa Dough From Glass Gem Corn (Simple and Easy Steps!)

        How To Make Your Own Homemade Tortillas Using Masa Dough From Glass Gem Corn (Simple and Easy Steps!)

        Did you know that you can use dry corn to make masa dough for your homemade tortillas? Masa is the essence of Mexico! It’s kinda the foundation of Mexican cooking and a lot of families still make their own to supply their daily consumption!

        It’s such an amazing feeling to think that I can make these tortillas using corn that I started from seed and harvested in my urban garden! This particular variety is called Glass Gem Corn, and it makes quite a show in the garden. It’s an easy recipe, and I’ll teach you how to exactly do it.

        How To Make Masa Dough For Your Homemade Tortillas

        Ingredients:

        • 450 g Dry Corn Kernels
        • 1 L of water
        • 2 x TBSP food-grade calcium Hydroxide
        • Metate stone (or blender)
        • Tortilla Press (or flat weight)

        Step-by-Step Procedure:

        • Remove the kernels. (Do not throw the cobs, you could use them for fire.)
        • Boil 1L of water and add 2 x tbsp food-grade calcium hydroxide
        • Add the kernel corn and boil for 30 minutes. Let it sit overnight
        • Drain and wash them in the morning
        • Grind the kernel into flour using a metate stone and roll it into a ball
        • Flat it out using a tortilla press
        • Cook 20 sec per side and add what you like

        TIPS:

        • If you don’t have a metate stone, you can use a blender.
        • If you don’t have a tortilla press, just get a flat weight of parchment paper
        • Any ingredient works for stuffing. I used guacamole, vegan duck, onions, tomato, vegan cheese, and parsley!

        The process of transforming corn into Masa Harina (corn flour) is called nixtamalization, and it’s a great method to soften the corn texture, vastly improve its nutritional profile, and preserve your homegrown corn for later use.

        Quick Tips for Growing Glass Gem Corn

        • Location: Choose a sunny spot in your garden with well-draining soil.
        • Planting: Sow glass gem corn seeds directly into the soil 3 weeks after the last frost date.
        • Spacing: Plant seeds 1 inch deep and 9-12 inches apart in rows 30-36 inches apart.
        • Watering: Keep the soil consistently moist, especially during the pollination period.
        • Fertilizing: use organic compost or compost tea
        • Harvesting: Harvest glass gem corn when the husks are dry and kernels are fully developed. Storage: Store dried cobs in a cool, dry place in a well-ventilated container.

        Health Benefits of Dry Corn Kernels

        1. Nutrient Powerhouse: Packed with essential vitamins and minerals, including vitamin C, magnesium, and potassium, dry corn kernels offer a nutritional boost to your diet.

        2. Dietary Fiber: Rich in dietary fiber, dry corn kernels aid in digestion, promote gut health and help manage weight by keeping you feeling full for longer.

        3. Antioxidant Properties: Dry corn kernels contain antioxidants like lutein and zeaxanthin, which are beneficial for eye health and may reduce the risk of age-related macular degeneration.

        4. Energy Source: The carbohydrates in dry corn kernels provide a steady source of energy, making them a great choice for active individuals and athletes.

        5. Gluten-Free: For those with gluten sensitivities or celiac disease, dry corn kernels offer a safe and delicious alternative to wheat-based grains.

        Growing glass gem corn and making it into masa dough for your homemade tortillas (or any dishes) is absolutely amazing. From planting, caring, harvesting, and cooking, all these things are enjoyable experiences. Nothing can beat the happiness of growing your own plants and transforming them into something delicious. Give it a try and have this fulfilling experience as well.

        Happy growing and cooking!

        0
          0
          Your Cart
          Your cart is emptyReturn to Shop