How To DIY Natural Gummies for Digestive Health (Fun and Easy!)

How To DIY Natural Gummies for Digestive Health (Fun and Easy!)

Since my surgery, my cravings have shifted from the usual sugary snacks to something more wholesome. That’s when my fiance Iasmina and I decided to create a delicious and healthy alternative: 100% natural gummies that satisfy your sweet tooth and support digestive health. Let’s dive into how you can make these nutrient-packed gummies using sea moss—a superfood loaded with essential vitamins, minerals, and antioxidants.
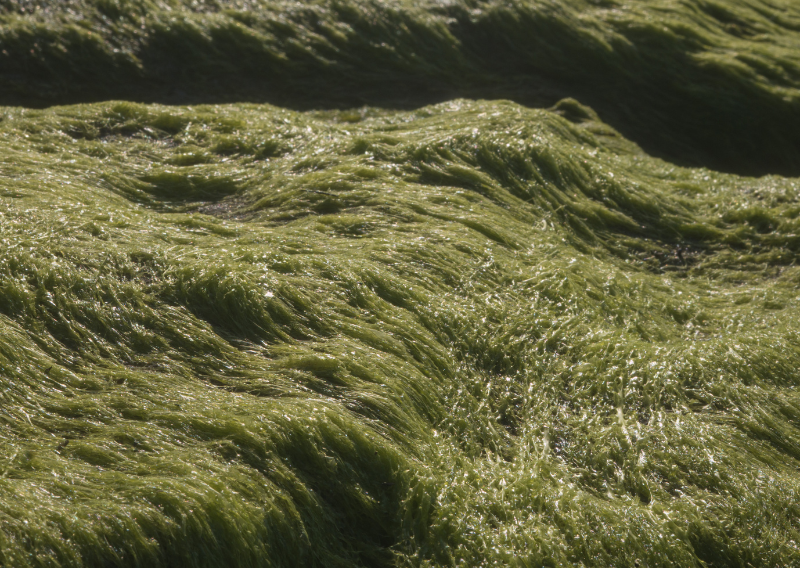
Why Sea Moss?

It’s loaded with essential vitamins and minerals like iodine, calcium, magnesium, and vitamins A and C. Plus, it’s a fantastic source of fiber, which promotes a healthy digestive system. With its high antioxidant content, sea moss also helps combat oxidative stress, making it a powerful addition to any diet.

Making Sea Moss Jelly

Before we get to the gummies, let’s start with making sea moss jelly. This jelly serves as a base for our gummies and can be used in smoothies, porridge, or soups for an added nutritional boost.

Ingredients:

  • Sea moss
  • Water

Instructions:

  1. Place the sea moss in a bowl and cover it with water. Let it soak overnight to soften.
  2. The next day, transfer the soaked sea moss to a pan and cover it with fresh water (you can use the soaking water if it covers the sea moss completely). Bring it to a boil, then reduce the heat and let it simmer for 15-20 minutes until the sea moss is almost completely melted. It’s okay if there are a few bits left.
  3. Blend the mixture with the boiled water until you achieve a smooth consistency.
  4. Pour the sea moss jelly into an airtight jar and refrigerate. It will last for up to a week or more and can be used in various recipes.

    Creating Your Natural Gummies

    Now that you have your sea moss jelly, you can turn it into delicious gummies. Here’s a simple recipe to get you started:

    Ingredients:

    • 1 cup fruit juice (your choice—berry, citrus, or tropical)
    • 2 tbsp agar agar (a plant-based gelling agent)
    • 3 tbsp sea moss jelly
    • 2 tbsp agave syrup or honey (for sweetness)

    Instructions:

    1. In a pan, combine the fruit juice and agar agar. Heat on low, stirring continuously until the agar agar is fully dissolved.
    2. Incorporate the sea moss jelly and your choice of sweetener into the mixture. Whisk until everything is well combined and smooth.
    3. Once the mixture thickens, use pipettes to pour it into your gummy molds. If you don’t have molds, you can pour it into a shallow dish and cut it into pieces later.
    4. Allow the gummies to set for about 20 minutes. They should be firm but chewy.
    5. Transfer your gummies to an airtight jar and store them in the refrigerator. They should stay fresh for around a week or more.

    These natural gummies are a great way to indulge your sweet tooth while supporting your digestive health. By making them at home, you can choose your own ingredients and skip the additives often found in store-bought treats.

    Feel free to try out different fruit juices and sweeteners to discover your favorite flavor. Have fun with the process and enjoy the tasty results!

    Happy gummy-making!

    DIY Watering Systems: Sustainable Solutions for Your Garden (Simple and Easy!)

    DIY Watering Systems: Sustainable Solutions for Your Garden (Simple and Easy!)

    If you’re passionate about gardening and focused on sustainability, you don’t need to spend a fortune on a high-tech watering system. With a little creativity and some recycled materials, you can build effective and eco-friendly watering solutions. These DIY systems are great for small spaces and especially useful if you’re going to be away for a few days. Me and my fiance, Iasmina already made all of them and I must say that they all serve their functions very well.

    Here are three easy, sustainable watering systems you can make at home:

    System 1: The Simple Plastic Bottle Watering Can

    Materials Needed:

    • Any size plastic bottle
    • Nail & Hammer

    Instructions:

    1. Take your plastic bottle and remove any labels. This will prevent them from clogging your system.
    2. Use a nail and hammer to carefully puncture several small holes in the bottle cap. The size and number of holes will determine the flow of water, so adjust according to your plants’ needs.
    3. Fill the bottle with water, screw the cap back on, and use it to water your plants. The holes will allow a gentle, controlled release of water, ensuring your plants get the moisture they need without waterlogging.

    This method is incredibly simple and cost-effective, and it makes use of materials that would otherwise be discarded.

    System 2: The Terracotta Olla

    Materials Needed:

    • Terracotta pot
    • Blue Tack
    • Terracotta saucer

    Instructions:

    1. Take a terracotta pot and place it inside a terracotta saucer. Use blue tack to seal any gaps between the pot and saucer. This creates a watertight seal that will prevent leaks.
    2. Bury the pot in your garden or plant container, leaving the rim above the soil. Fill the pot with water, and as the soil dries, it will draw moisture from the olla, providing a steady supply of water to your plants.

    This system is great for ensuring your plants receive a slow and steady supply of moisture. It’s particularly useful for larger plants or garden beds.

      System 3: The Self-Watering Pot

      Materials Needed:

      • 2L+ size plastic bottle
      • Wick material (100% cotton works best)
      • Growing medium
      • Water

      Instructions:

      1. Cut the bottom off the plastic bottle and remove any labels. Make sure the bottle is clean.
      2. Thread a piece of cotton wick through the bottle’s neck. The wick should reach the bottom of the bottle and extend a few inches beyond the neck.
      3. Fill the bottle with water and bury it in the soil of your plant pot or garden bed, with the wick in the soil. The wick will draw water from the bottle into the soil, keeping your plants hydrated.

      This self-watering system is perfect for smaller pots or containers and ensures that your plants receive consistent moisture.

      Creating a DIY watering system is both a sustainable choice and a fun project that can help you save money. Whether you’re repurposing a plastic bottle into a basic watering can, using a terracotta olla for slow release, or setting up a self-watering pot, these systems are both effective and easy to make. They’re particularly handy for keeping your plants hydrated when you’re not around.

      Happy gardening!

      3 Flowers To Grow And How To Make Them DIY Flower Medicine

      3 Flowers To Grow And How To Make Them DIY Flower Medicine

      Recently, I shared 3 medicinal flowers that you can grow in your garden. Today, I’ll be talking about another three powerful medicinal flowers that you can grow in your garden as well: Echinacea, Rose of Sharon, and Four O’Clock. These flowers don’t just add beauty to your space—they bring health benefits too. Let’s dive into how you can use them to create salves, infusions, and poultices.

      Echinacea: A Salve for Your Skin

      Echinacea is famous for boosting the immune system, but it’s also fantastic for skincare. By growing this flower, you can create your own healing salve, which works wonders on minor cuts, burns, and dry skin.

      Here’s a simple recipe to make your own Echinacea Salve:

      • 10-20 Echinacea flower heads
      • 500 ml almond oil
      • Vegetable wax or beeswax
      • Vitamin E oil
      • Essential oils (optional)

      Begin by gently heating the echinacea flower heads and almond oil in a double boiler. Let the oil infuse for about an hour, then strain out the flower heads. Next, melt some vegetable wax or beeswax and combine it with the infused oil. For preservation, add a few drops of Vitamin E oil, and if you like, include some essential oils for fragrance. Once the mixture cools, you’ll have a soothing salve ready to heal your skin.

      Echinacea is also quite easy to grow in most climates. Just plant it in a sunny spot with well-drained soil, and you’ll soon have a steady supply of medicinal flowers to harvest.


      Rose of Sharon: A Refreshing Infusion

      Rose of Sharon is often admired for its ornamental beauty, but it’s also great for making a cooling, refreshing herbal infusion. The flower’s soothing qualities can help ease stress and aid digestion, making it a lovely addition to your herbal remedies.

      Here’s how to make a Rose of Sharon Infusion:

      • 10-20 flower heads
      • 500 ml boiling water
      • Ice cubes
      • 5 lemon wedges
      • 500 ml cold water

      To make a refreshing Rose of Sharon infusion, start by steeping the flower heads in boiling water for about 15 minutes. After straining out the flowers, let the infusion cool down. For extra flavor, add ice cubes and lemon wedges, then top it off with cold water. This drink is perfect for cooling off on a hot day while calming your mind and aiding digestion.

      Rose of Sharon thrives in sunny spots with well-drained soil, making it an easy addition to any garden. Plus, its vibrant blooms bring a pop of color to your space!

        Four O’Clock: A Quick and Effective Poultice

        The Four O’Clock flower may not be as well-known, but it’s a hidden medicinal treasure, especially for treating skin inflammation and wounds. A simple Four O’Clock poultice can work wonders in soothing irritated skin.

        You’ll need:

        • 20 flowers
        • Warm water
        • Mortar and pestle
        • Bandages

        Crush the Four O’Clock flowers using a mortar and pestle, gradually adding small amounts of warm water to form a paste. Apply the mixture directly to the affected area, then cover it with a bandage. Leave the poultice on for several hours to help reduce inflammation and encourage healing.

        Four O’Clock flowers are easy to grow, especially in warm climates with well-drained soil. They bloom in the late afternoon, adding a unique charm to your medicinal garden.

        The Power of Medicinal Flowers

        Growing these medicinal flowers in your garden is a sustainable and eco-friendly way to naturally address everyday health concerns. Whether you’re crafting an Echinacea salve, a refreshing Rose of Sharon infusion, or a soothing Four O’Clock poultice, these flowers provide plenty of benefits.

        With just a little time and effort, your garden can be more than a beautiful space—it can also serve as your source for simple, natural remedies. Start planting these flowers today, and you’ll soon have everything you need to make your own DIY medicine!

        How To Boost Your Health with These 3 Medicinal Garden Flowers

        How To Boost Your Health with These 3 Medicinal Garden Flowers

        Gardening isn’t just about creating a beautiful landscape—it’s about growing plants that support your health and well-being. If you’re interested in sustainable products and DIY remedies, then adding medicinal flowers to your garden is a wonderful place to start. These flowers don’t just enhance your garden’s beauty with vibrant colors and lovely fragrances, but they also offer incredible healing properties. Let’s explore three medicinal flowers you can grow and even use in homemade recipes.

        Lavender

        Lavender is like a hero among medicinal plants. Its calming effects are well-known, helping to ease anxiety, promote better sleep, and soothe irritated skin. With its lovely scent, lavender makes a fantastic addition to any garden and offers plenty of uses.

        Lavender & Oats Soap Recipe:

        • 500g soap base
        • 2 tbsp oats
        • 20 drops lavender essential oil
        • 2 tbsp dried lavender flowers

        Instructions:

        1. Melt the soap base in a double boiler.
        2. Add grated shea butter (if using) and mix well.
        3. Once fully melted, turn off the heat and mix in the lavender essential oil, oats, and dried lavender flowers.
        4. Pour the mixture into silicone molds and let it solidify.

        Lavender-infused soap gives your skin a calming cleanse, making it ideal for relaxing after a long day. Plus, the oats gently exfoliate, leaving your skin feeling silky and smooth.

        Calendula

        Calendula, or pot marigold, is a fantastic flower celebrated for its skin-healing abilities. It’s often used to ease inflammation, heal cuts and scrapes, and calm dry or irritated skin. Having calendula in your garden means you’ll have this powerful flower at your fingertips all year long.

        Calendula Skin Salve Recipe:

        • Sun-dry fresh calendula for 5-7 days.
        • Infuse dried calendula in your favorite oil (like olive oil) for 30 days.
        • In a double boiler, melt 1 cup of calendula oil with 3 tbsp soy or beeswax.
        • Optional: Add essential oils for fragrance, but keeping it simple is just as effective.
        • Pour the hot mixture into containers and let it cool completely before use.

        Calendula salve is a great natural alternative to store-bought creams, offering deep moisturization and healing for minor skin issues. Perfect for gardeners dealing with sunburn or scrapes!

          Nasturtium

          Nasturtiums are not only stunning but also incredibly useful. These vibrant flowers are loaded with vitamins and antioxidants that help strengthen your immune system. You can eat both the leaves and flowers, which add a spicy kick to salads and other dishes. Plus, nasturtiums are great for natural remedies, offering more than just flavor.

          Nasturtium Leaves Vellutata Recipe:

          • 15-20 nasturtium leaves
          • Any vegetables you like (carrots, potatoes, etc.)
          • 3 tbsp oat cream
          • Olive oil
          • Optional: Croutons and nasturtium flowers for garnish

          This creamy soup is a wonderful way to enjoy the benefits of nasturtiums. The leaves add a peppery punch, while the oat cream creates a silky texture.

          Bonus Recipe: Nasturtium Flowers Butter

          • 250g plant-based butter
          • 1 handful of nasturtium flowers
          • Salt & pepper

          This butter is not only tasty but also packed with nutrients. Spread it on bread or melt it over cooked vegetables for an added kick of flavor and a dose of health benefits.

          Sustainability Tip: Grow and Reuse

          These flowers aren’t just good for your health; they also support a sustainable lifestyle. By growing lavender, calendula, and nasturtiums at home, you’ll make fewer trips to the store for skincare products and reduce packaging waste. Many of these DIY creations, like lavender soap, can be kept for months, letting you enjoy them well after the harvest season ends.

          Adding medicinal flowers to your garden connects you to nature in a special way. They offer beauty, healing, and a sense of independence. So why not start growing these amazing plants and make your own eco-friendly remedies at home? 🌸

          Happy gardening!

          Quick and Easy Steps To Make Homemade Mayo using Fresh Soybeans

          Quick and Easy Steps To Make Homemade Mayo using Fresh Soybeans

          Did you know you can make homemade mayo using fresh soybeans? This plant-based, protein-packed ingredient can easily be transformed into a creamy, delicious mayo that’s not only healthier but also more sustainable. Recently, I had so much fun making this with our friend Albert, and honestly, it tastes amazing!

          If you love sustainable recipes, you’re going to enjoy this! Let’s dive into the step-by-step process of making homemade soybean mayo.

          Why Soybean Mayo Is Unique

          The key ingredient that makes this mayo truly special is fresh soybeans. Unlike traditional mayo, which typically relies on processed oils and eggs, using soybeans as a base provides a plant-based protein boost, making it plant-based and more nutritious. Soybeans are rich in fiber, vitamins, and healthy fats, giving this mayo a nutritional edge over conventional versions.

          By swapping out eggs for soybeans, you’re opting for a more eco-friendly option, as soybean cultivation generally has a smaller carbon footprint than animal-based products. This recipe not only enhances your diet but also aligns with sustainable living!

          Health Benefits of Homemade Soybean Mayo


          1. Plant-Based Protein: Fresh soybeans provide a great source of plant-based protein, making this mayo a nutritious option. 
          2. Heart-Healthy Fats: Olive oil, a key ingredient, is rich in healthy monounsaturated fats that support heart health and reduce inflammation. 
          3. Rich in Antioxidants: Olive oil is packed with antioxidants, which help protect the body from oxidative stress and reduce the risk of chronic diseases. 
          4. No Artificial Additives: By making your own mayo, you avoid preservatives and artificial ingredients found in many store-bought versions. 
          5. Customizable for Diets: You control the salt, flavor, and other ingredients, allowing you to adjust it for low-sodium or other dietary preferences. 
          6. Lower in Saturated Fats: Without the use of eggs or heavy oils, this version has less saturated fat compared to traditional mayo, making it a lighter alternative.

          How to Make Homemade Soybean Mayo

          Making this homemade mayo is simple and rewarding. Here’s a step-by-step guide based on the recipe Albert and I put together.

          Ingredients:

          • 1 cup soymilk (made from fresh soybeans)
          • 1 cup olive oil
          • 1 tbsp mustard
          • 1 tbsp maple syrup
          • Vinegar and lemon juice (to taste)
          • Salt and garlic (to taste)

          Instructions:

          1. To start, add water to your fresh soybeans and mix them thoroughly to loosen the shells. Once separated, compost the shells to keep things zero-waste!


          2. After that, blend the de-shelled soybeans with a little water until smooth. Strain the mixture to produce fresh, silky soymilk. Next, cook the strained soymilk to remove any bitterness, ensuring your mayo has a smooth and pleasant flavor.


          3. In a blender, mix 1 cup of your homemade soymilk with 1 cup of olive oil, 1 tablespoon each of mustard and maple syrup, along with vinegar, lemon juice, salt, and garlic. Blend until the mixture becomes smooth and creamy.


          4. Transfer your soybean mayo to a jar and refrigerate it for a few hours, allowing the flavors to meld and the texture to thicken perfectly.

          Making your own mayo allows you to use fresh, plant-based ingredients that are not only better for you but also more environmentally friendly. It’s a win-win for those who prioritize sustainability and healthy eating.

          Give this recipe a try, and you’ll discover that homemade mayo elevates the flavor of your dishes to a whole new level. It’s a treat you can feel great about sharing with friends and family!

          0
            0
            Your Cart
            Your cart is emptyReturn to Shop