DIY Swede Crunchy Rolls: Easy and Delicious Plant-Based Recipe

DIY Swede Crunchy Rolls: Easy and Delicious Plant-Based Recipe

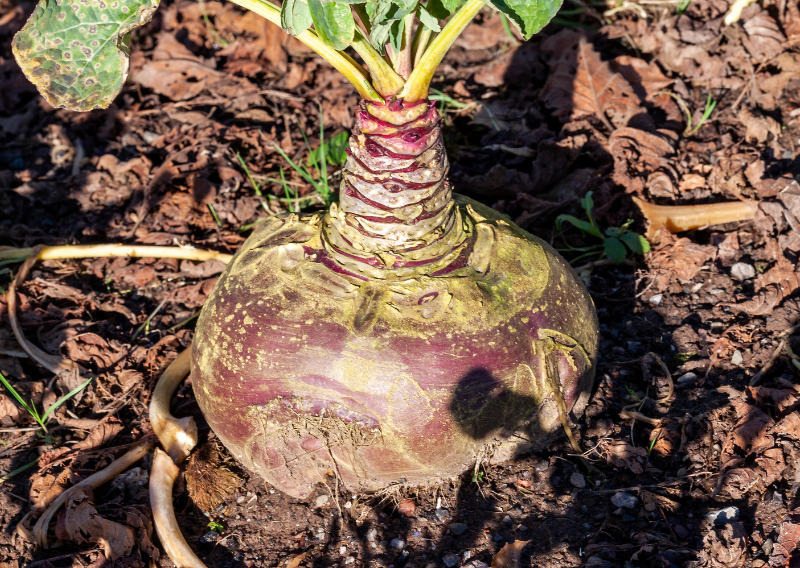
If you want to add a unique vegetable to your culinary collection, swede is a fantastic choice! This hybrid of turnip and cabbage was developed in Sweden in the 17th century, and it’s often overlooked, but it can be a tasty addition to both your garden and your meals. In this blog, we’ll dive into how to grow swede and turn it into delicious, crunchy rolls that are perfect for sharing with friends and family.

Growing Swede

I started my swede journey in late May by sowing seeds in the greenhouse. Planting two seeds per cell and then thinning them down to one plant has worked really well for me. One major advantage of starting seedlings indoors is that it protects them from those annoying flea beetles, helping the plants thrive.

As the swedes grow, I make it a point to remove the lower leaves every couple of weeks. This simple task keeps the plants looking neat and helps reduce slug activity—something every gardener appreciates. The great thing about swede is its resilience; you can harvest them anytime during winter. These hardy vegetables can handle freezing temperatures and won’t rot in wet weather, making them a reliable crop for the colder months.

    Swede Crunchy Rolls: A Comfort Food Recipe

    Swede is surprisingly similar to potatoes in texture and taste, which makes it a versatile ingredient in many dishes. Here’s how to create swede crunchy rolls that will impress your family and friends.

    Ingredients

    • 1 medium swede
    • 3-4 medium potatoes
    • 1-2 onions
    • 2-3 garlic cloves
    • 4 tablespoons nigella seeds
    • Any spices you like (cumin, paprika, or chili flakes work well)
    • Filo pastry

    Instructions

    1. Start by peeling and dicing the swede and potatoes. Chop the onions and garlic. In a large pot, boil the swede and potatoes until tender, then drain.

    2. In a skillet, heat a bit of oil and sauté the onions and garlic until golden. Combine with the boiled swede and potatoes, and season with your choice of spices and nigella seeds. Mash the mixture until it reaches a slightly chunky consistency.

    3. Preheat your oven to 375°F (190°C). Lay out sheets of filo pastry, brushing each layer with a little oil or melted butter. Place a spoonful of the filling on one edge of the pastry, then fold and roll tightly to form a roll.

    4. Place the rolls on a baking sheet lined with parchment paper and bake for 20-25 minutes, or until they are golden and crispy.

    5. Let the rolls cool for a few minutes before serving. They make for a great appetizer or a comforting main dish, paired with a fresh salad or a tangy dipping sauce.

    A Versatile Vegetable

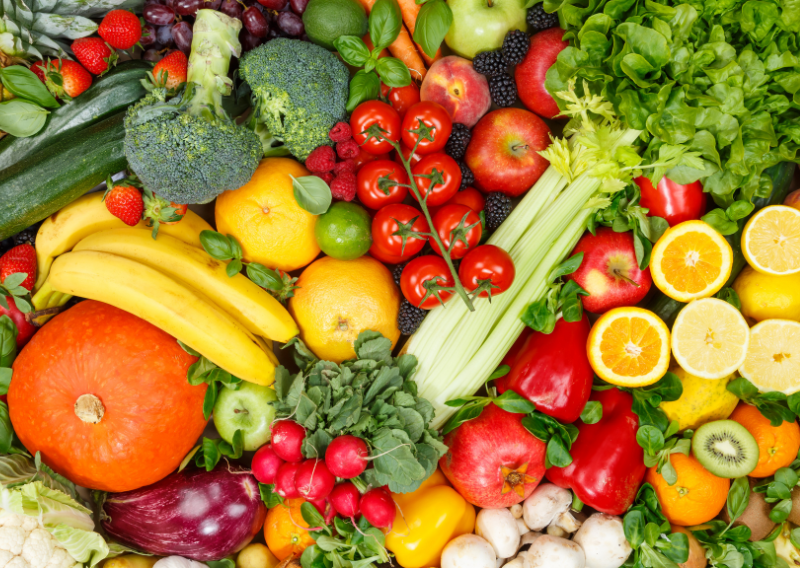
    Swede is not only easy to grow but also a fantastic addition to all sorts of dishes. Whether you roast it, mash it, or use it in soups, this vegetable really stands out in many recipes. By adding swede to your meals, you’ll enjoy its comforting flavor while also enriching your plant-based diet with nutritious ingredients.

    Happy gardening and cooking!

    How To Boost The Soil Biology of Your Garden Using Common Ingredients

    How To Boost The Soil Biology of Your Garden Using Common Ingredients

    If you’re looking for a simple and budget-friendly way to boost the health of your garden soil, lactic acid bacteria (LAB) could be just what you need! I actually teamed up with @epicgardening to explore this, and it turns out LAB is one of the easiest and most effective ways to improve soil biology using just a few basic household ingredients.

    What is LAB?

    Lactic Acid Bacteria (LAB) provides a reliable source of beneficial microbes that can significantly boost your soil’s biological activity. LAB helps decompose organic matter, making nutrients more accessible to your plants and improving the overall soil structure. Once you’ve made a batch, it can last for years in your fridge, offering a cost-effective, long-term solution.

    Benefits of LAB

    • Stimulate Compost: LAB enhances microbial activity in your compost pile, speeding up decomposition and helping to transform organic waste into nutrient-dense compost more quickly.


    • Loosen Compacted Soil: Dealing with heavy, compacted soil? LAB can help by encouraging microbial life that naturally aerates the soil, making it easier for roots to grow and water to flow.


    • Soak Your Seeds & Root Mass: Soaking seeds or plants in diluted LAB before planting promotes healthy root development, giving them a strong and healthy start.


    • Combat Airborne Pathogens: As a foliar spray, LAB helps protect plants from airborne pathogens, acting as a natural, chemical-free shield to keep them healthy.

    The Simple LAB Recipe

    What You’ll Need:

    • 2 cups organic rice
    • 1 liter raw milk
    • Sieve
    • Jar
    • Cheesecloth

    Instructions:

    1. Begin by rinsing your rice with water. This step is important because it captures the starches that LAB will thrive on.
    2. Pour the rice water into a jar and let it sit in a dark, cool spot for 2-3 days. During this time, the water will ferment and the lactic acid bacteria will start to grow.
    3. After 2-3 days, mix the fermented rice water with raw milk. Let it sit for about a week. As it ferments, the liquid will separate into curds and whey. The whey, which is the liquid portion, is what you want since it’s full of beneficial bacteria.
    4. Strain the mixture using a sieve to keep the whey. This liquid is your concentrated LAB solution.

    How to Use LAB

    Dilute your LAB solution with rainwater or filtered water at a 1:1000 ratio. For example, if you’re using 1 liter of LAB, you’ll need 1,000 liters of water. This dilution makes it safe and effective for your plants, compost, and soil.

    Why LAB is Important for Sustainable Gardening

    The great thing about using LAB in your garden is that it’s not only super effective but also sustainable. With simple ingredients like rice and raw milk, you’re creating a biological powerhouse for your garden that cuts down on the need for chemical fertilizers and synthetic soil conditioners.

    LAB promotes natural processes that improve soil health over the long term, making it perfect for anyone trying to garden more sustainably.

    So, if you want a cheap, effective, and eco-friendly way to boost your soil biology, LAB is definitely worth a try! 

    Happy gardening!

    How to Make Your Own Beetroot Ketchup: A Garden-to-Kitchen Delight

    How to Make Your Own Beetroot Ketchup: A Garden-to-Kitchen Delight

    If you enjoy growing your own vegetables or are looking for a creative way to preserve fresh ingredients, this beetroot ketchup recipe is a fantastic option. Using produce straight from your garden is not only satisfying but also a sustainable way to ensure that nothing goes to waste. This homemade ketchup is perfect for adding a burst of flavor to your meals while preserving your veggies for months.

    Recently, I decided to experiment with the beetroots from my garden and make something unique—beetroot ketchup. It’s a fun alternative to traditional ketchup, offering a rich, earthy flavor with a hint of sweetness. I like to think of it as winter ketchup—it preserves your veggies and brings color to colder months. The best part? You can easily swap ingredients based on what’s available in your fridge or garden.

    Using Fresh Ingredients from the Garden

    There’s something special about turning freshly harvested produce into a homemade staple. Beetroots, leeks, onions, and carrots all grow well in the garden, and when combined, they create a flavorful ketchup that’s both healthy and delicious. This recipe also helps reduce food waste by allowing you to use up any extra veggies before they spoil.

    Feel free to adapt the recipe to whatever’s in your kitchen. Tomatoes, peppers, or even apples can be great substitutions if you don’t have all the listed ingredients.

    Beetroot Ketchup Recipe

    Here’s the simple recipe:

    Ingredients:

    • 1kg Beetroot
    • 2 Tbsp Olive oil
    • 1 Leek
    • 1 Red onion
    • 1 Purple carrot (or any variety)
    • 1 Stick of celery
    • 1-2 Cloves of garlic
    • 1 Tsp Chili flakes
    • 1 Tsp Salt
    • 175ml Red wine vinegar
    • 70g Brown sugar

    Instructions:

    1. Peel and chop your beetroot, leek, red onion, carrot, and celery into small chunks.
    2. Heat the olive oil in a large pan, then sauté the vegetables until soft (about 10 minutes).
    3. Add garlic, chili flakes, and salt, and cook for another minute.
    4. Pour in the red wine vinegar and brown sugar, stirring to combine. Let it simmer for 45 minutes until the vegetables soften.
    5. Blend the mixture into a smooth ketchup consistency.
    6. Pour into sterilized jars, seal, and store in a cool, dark place for up to 3 months. Once opened, refrigerate and use within 2 weeks.

      Why Make Your Own Ketchup?

      Making your own beetroot ketchup is a fun and sustainable way to preserve your harvest. It’s a fantastic way to avoid store-bought preservatives while extending the life of your vegetables. The vinegar and sugar work together to keep the ketchup fresh for up to 3 months in a cool spot. Not only does this reduce food waste, but it also gives you control over the ingredients and flavors.

      A Flexible Recipe for Any Season

      One of the great things about this recipe is how versatile it is. If you don’t have beetroot, you can easily swap it out for other veggies like carrots, parsnips, or even zucchini. You can replace leeks with onions, and if you’re out of red wine vinegar, apple cider vinegar works just as well. This ketchup can be adapted to whatever’s in season or whatever you have on hand, making it a reliable recipe all year round.

      So, the next time you’ve got extra veggies from your garden or sitting in the fridge, give beetroot ketchup a shot. It’s a tasty, eco-friendly way to cut down on waste, preserve fresh ingredients, and bring something new to your meals.

      Happy eating!

      Homemade Scarpaccia: How To Cook This Delicious Dish

      Homemade Scarpaccia: How To Cook This Delicious Dish

      These days, we throw away enough food from our kitchens to fill almost 10 Wembley stadiums every year, and that has a big impact on the environment. Even though it’s a serious issue, food waste often gets overlooked. As we try to live more sustainably, coming up with creative ways to use every part of our ingredients can really help. A great example of this is a recipe called Scarpaccia.

      Scarpaccia is a traditional Italian dish that’s basically a savory tart made with thinly sliced vegetables. It’s an awesome way to make the most of fresh produce from the garden, especially when you have extra zucchinis and onions you don’t know what to do with. Not only does it taste amazing, but it’s also a simple way to cut down on food waste.

      Scarpaccia Recipe

      Ingredients:

      • 3 zucchinis, thinly sliced with a mandolin
      • 1 onion, thinly sliced with a mandolin
      • 1 tsp salt
      • 1 tsp herbs of your choice (e.g., basil, oregano, or thyme)
      • 2 tbsp nutritional yeast
      • 3 minced garlic cloves
      • 1 cup all-purpose flour
      • 1/4 cup cornmeal
      • 1 cup water (use the one squeezed from the zucchini)
      • 2 tbsp olive oil

      Instructions:

      1. Thinly slice the zucchinis and onion with a mandolin so you get even, thin slices. Put the zucchini and onion slices in a colander, sprinkle with a teaspoon of salt, and let them sit for around 15 minutes. This helps draw out the extra moisture from the veggies.
      2. After 15 minutes, gently squeeze the zucchini and onions to get rid of the excess liquid, but don’t throw it away—you’ll use it for the batter later. Set it aside in a bowl. Preheat your oven to 375°F (190°C) so it’s ready when you need it.
      3. In a mixing bowl, combine the all-purpose flour, cornmeal, nutritional yeast, minced garlic, and any herbs you’re using. Slowly pour the reserved zucchini and onion liquid into the dry mix, stirring constantly until you have a smooth batter. If the batter feels too thick, just add a little more water to loosen it up.
      4. Next, fold the squeezed zucchini and onion slices into the batter, making sure they’re evenly coated. Lightly grease a baking dish or tray with olive oil and spread the zucchini and onion mixture evenly across it. Bake in the preheated oven for 30-35 minutes, or until the Scarpaccia is golden and firm to the touch.
      5. When it’s done, take it out of the oven and let it cool for a few minutes.

      Why Scarpaccia Matters

      By adding Scarpaccia to your meal plan, you’re not just treating yourself to a tasty dish—you’re also making a stand against food waste. This recipe makes the most out of every ingredient, from the water squeezed out of the veggies to any leftover herbs or spices. It’s a simple but effective way to live a more sustainable lifestyle.

      As we all try to find ways to tackle environmental issues, even small actions can make a big difference. Scarpaccia shows how we can enjoy healthy, flavorful meals while doing something good for the planet. So, next time you find yourself with extra veggies, give this recipe a try and take a small step toward cutting down on food waste in your kitchen.

      Happy eating!

      Tasty Enoki Mushroom Dish: Quick and Easy Meal At Home

      Tasty Enoki Mushroom Dish: Quick and Easy Meal At Home

      If you’re looking for a tasty and sustainable ingredient for your plant-based meals, enoki mushrooms are a fantastic option. These mushrooms have been a staple in Asian cooking for centuries and are now catching on globally for their unique texture and flavor. Here’s why Enoki mushrooms are one of our favorites and a great addition to your cooking and some tips on how to use them in your dishes. In this blog, I’ll also teach you the enoki mushroom burger recipe and I hope you’ll like it.

      Why Enoki Mushrooms?

      Enoki mushrooms are special because of their unique texture, which gives a satisfying crunch and chew when cooked. This makes them a fantastic choice for plant-based recipes, providing a delightful alternative to more familiar ingredients.

      Health Benefits of Enoki Mushrooms

      Enoki mushrooms are known for their potential health benefits. They are a rich source of antioxidants, which help neutralize harmful free radicals in the body, potentially reducing the risk of chronic diseases. These mushrooms are also known to boost the immune system, making them a great addition to your diet, especially during cold and flu season. Enoki mushrooms are also high in dietary fiber, which supports digestive health and promotes a feeling of fullness.

        How to Use Enoki Mushrooms in Cooking

        Crunchy Enoki Mushroom Burgers

        Ingredients for the batter:

        • 130g flour
        • 100g corn flour
        • 1 tsp baking powder
        • ½ tsp garlic granules
        • Salt & pepper to taste
        • ½ tsp paprika
        • 400ml water


        1. In a bowl, mix the flour, corn flour, baking powder, garlic granules, salt, pepper, and paprika.
        2. Gradually add water, stirring until the batter is smooth.
        3. Dip the enoki mushrooms into the batter, making sure they are fully coated.
        4. Fry the coated mushrooms until golden and crispy.

        Green Mayo Recipe

        To complement your enoki burgers, try making a homemade green mayo. This fresh and creamy mayo adds a burst of flavor and pairs perfectly with the crispy mushrooms.

        Ingredients for the green mayo:

        • 1 cup soy milk
        • 1 cup olive oil
        • 1 tsp salt
        • 2 tbsp lemon juice
        • 1 tbsp mustard
        • 1 tbsp maple syrup
        • Optional: 1 tbsp sage, 1 tbsp chive, 1 tbsp parsley, 1 tsp spirulina
        • Optional: 1–2 garlic cloves
        • 2 extra tbsp olive oil for a thicker mayo
        1. Blend all ingredients until smooth and creamy. Adjust garlic and herbs to taste for a fresh, savory twist.

        Enoki mushrooms are a fantastic ingredient for anyone exploring plant-based cooking. They offer a unique texture and flavor, making them a versatile addition to a variety of dishes.

        Whether you’re preparing a crispy burger or experimenting with new recipes, enoki mushrooms provide a nutritious and sustainable choice that’s sure to level up your meals.

        Happy cooking!

        0
          0
          Your Cart
          Your cart is emptyReturn to Shop