Increase Your Garden Growth: The Secret Weapon of Korean Natural Farming (FPJ)

Increase Your Garden Growth: The Secret Weapon of Korean Natural Farming (FPJ)

Are you ready to take your gardening game to a whole new level? Let’s talk about an amazing gardening secret from the heart of Korea – Fermented Plant Juice, or FPJ as it’s widely known. This incredible addition to your gardening routine can supercharge your plants and make them more resistant to temperature extremes, truly a boon in today’s changing climates- a simple yet potent way to unlock the full potential of your garden.

Growing up as a kid in Italy where I can see my grandparents’ love for gardening, I’ve witnessed the way they care about the plants, and growing up, I’ve been thinking about how to find a more natural method of growing and this is where we found FPJ on our gardening journey. So if you want an organic and sustainable way to keep your plants healthy, you have to try this method.

Materials Needed

-Fresh plant material (e.g., alfalfa, comfrey, nettles, herbs)
-Brown sugar or molasses
-Water
-A large container with a lid
-Cheesecloth or a fine mesh strainer
-A smaller container for storing the finished FPJ

Here’s How You Can Do It:

1. Choose Your Fresh Plant Material
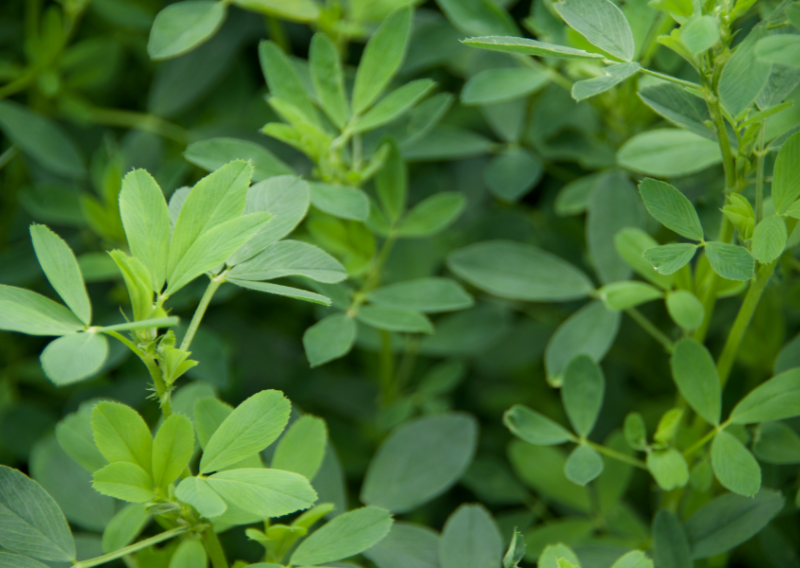
I’ve personally been harnessing the power of alfalfa for its high nitrogen content and triacontanol, a potent natural growth stimulant. But don’t limit yourself! Countless plants are out there, waiting to lend their strength to your garden.

2. Harvest At The Perfect Time
Try to harvest your plants before sunrise. During these early hours, they have the perfect moisture content, ready to be transformed into your FPJ mix.

3. Prepare Your FPJ Mix
After harvesting, weigh your plants and procure an equal weight of brown sugar. Go as naturally as possible with your sugar choice – we don’t want to harm those beneficial bacteria. Mix your plant material and sugar well, then cover with porous paper. Let this mix sit for 1-2 hours – patience, my friends!

4. Bottle Up Your Brew
Transfer the mixture to a glass or clay jar and cover with a kitchen towel (secured with an elastic band). And now, for the hardest part – let it sit for 7 days without shaking or stirring (I know, the temptation is real!).

5. Strain and Store
After the week is up, strain the mixture using a mesh screen. Avoid the temptation to squeeze – let gravity do its job. Store your FPJ in a dark, cool place. Remember, no stirring or shaking!

6. The Magic Ratio
When it comes to using your FPJ, remember the magic dilution ratio of 1:1000 (for example, 1ml on 1L of water) to water or spray your plants.

Be advised not to use your FPJ on crops that are the same as the plant material used to produce it. Your FPJ is best used during the early stages of the plant’s vegetative growth.

So there you have it! Let’s embrace the Korean Natural Farming way and bring the magic of FPJ to our gardens, so you can transform your garden into a thriving oasis of greenery and beauty. Remember, the best garden is a loved garden. Happy gardening!

Easy DIY Trellis: The Must-Have Garden Support for Climbing Plants

Easy DIY Trellis: The Must-Have Garden Support for Climbing Plants

Do you want to maximize your garden space at home? Building a trellis is the simple answer. Now, what exactly is a trellis? Simply put, it’s a framework or lattice structure designed to support climbing plants such as peas and cucumbers, encouraging them to reach new heights—quite literally! It’s best to have, especially when you have a small garden like mine. My current garden is modest, 8 x 5 meters, so I needed this. I built this trellis inside my raised bed, which is 1.2×1 meters (47.2×39.3 inches). The sizes for your raised bed could be different, but the technique is the same, so you just need to measure it and adapt what I’m doing to the sizes you are working with.

But its significance transcends mere functionality; it’s a game-changer for any aspiring gardener, and here’s why:

Vertical Space Maximization

With urbanization on the rise and garden sizes reducing, the need for space-efficient gardening solutions is greater than ever. Trellises provide a vertical retreat, allowing you to maximize your limited square footage.

Aesthetic Appeal

Who says practicality has to compromise beauty? Trellises are architectural marvels in your garden, transforming ordinary plots into fascinating landscapes. Remember that gardening isn’t just about nurturing plants—it’s about creating a sensory experience so you can experiment with how you want your trellis to look!

Healthy Growth and Maintenance

Climbing plants have an essential desire to soar, but they require guidance to reach their full potential. The trellis then becomes a support system for your plants. It promotes appropriate vine development by providing a structured framework, preventing sprawling disorder. Consider giving your plants a robust ladder to climb, ensuring that they grow upward rather than sprawling across the ground. Trellises also make pruning, watering, and harvesting easier, easing maintenance responsibilities and allowing you to spend more time enjoying your garden.

How To Build A Trellis

Note: The frame I built inside my raised bed was 1.8 m x 86 cm (70.86 x 34 inches), but you can adjust the measurement accordingly if you need a different size of trellis.

-Put the timbers (I used this timber T2.2 cm x W38 cm x L1.8 m that I bought from B&Q) on the floor on a flat surface and measure 86 cm (34 inches) between them. Now cut the timber to the right sizes and arrange them into a square frame.

-Put some wood under every corner so it will be easier for you to drill through it.

-Use screws measuring 3.5cm x 5 cm so they are not too thick, and you can drill them directly in without a pilot hole.

-Once the wood is jointed, add a bridge to each corner to make the structure more solid. Once the first side is ready, just do the same to create another side.

-Now you’ll need to add small nails along the whole perimeter of your wooden frame at 12.5cm (5 inches) intervals. Do not thread them in!

-For weaving the frame with thread, I’m using 100% cotton thread!

-Simply secure one end of the thread to the nail, and then start to weave the frame until it’s complete.

-Once the sides are done, attach the base to the inner part of the raised bed, and do the same on the other side with the second frame.

-Measure the distance between the 2 sides and attach 2 pieces of wood in between them to make it more solid.

-Cotton thread is 100% compostable, so once the plant finishes the growing cycle, you can just snip off the whole thread and compost the whole thing.

Trellis is much more than a garden accessory; it’s a must in small (and even big) gardens. Whether you’re a newbie or an expert gardener, incorporating trellis into your planting journey is a decision you won’t regret.

Happy growing!

Make Your DIY Salt At Home – A Step-By-Step Procedure

Make Your DIY Salt At Home – A Step-By-Step Procedure

Hear me out. I know today’s Valentine’s Day and there’s no need to be salty but it’s actually the thing that I’m going to share with you today.

Prepare to tickle your taste buds because one of our favorite kitchen hacks is now revealed for you.

Not already familiar with DIY salt? No worries! Let’s get down with some “salty” facts:

Did you know that you can create a DIY salt using squeezed citrus, wilted herbs, or any food scraps? Yup! Those things in your kitchen that you thought were a waste, are a gem in disguise!

Now, I know what you’re thinking “Alessandro, why would I make a DIY salt if I can simply buy it in the convenience store?”

Well, I have three answers for you! The first reason is that DIY salt is much healthier than those in the convenience store. You don’t want to spend money on a thing that will cause harm to your body in the future. The second is that this is much cheaper and cost-effective (it’s actually free, though). The third and most important is you’re helping Mother Earth by recycling and reusing food scraps – remember that a simple act of kindness to the environment can go a long way!

Alright, enough for that, and let’s proceed to the exciting part…

What you need:

  • 300g Celtic salt
  • 150g citrus peel or 150g herbs or 2 cups wine
  • Rosemary stem

How to do it:

For the citrus:

1. Cut leftover peels and blend until reaching the preferred consistency; small for us, but you can make a paste or keep them thicker.
2. Mix blended peels with salt until combined.
3. Spread mixture on a baking tray and bake at 60°C for 30-40 minutes, stirring occasionally.
4. Ensure peels are perfectly dry.
Store in an airtight container for up to a year.
5. Optionally, grind for a finer salt texture.

For the wine:

1. Add wine and rosemary to a pot, bring to a boil, then simmer until reduced by 1/3.
2. Let cool and remove the rosemary branch.
3. Quickly mix in the salt.
4. Spread on a baking tray and bake at 50°C for 20 minutes until dry.

For the herbs:

1. Blend wilted herbs and salt until fine.
2. Spread the mixture on a baking tray, smoothing it out.
3. Bake at 60°C until dry.

You’re now ready to make a DIY salt anytime!

Be careful: This DIY salt will add so much flavor to your vegetables, tofu, and desserts so please be mindful because you might eat A LOT! ????

Thank you for taking your time to learn and I’m very excited about how this will add fun to your kitchen while doing something great for the planet.

Tasty and Nutritious: Easy and Simple Steps of How To Make Black Garlic

Tasty and Nutritious: Easy and Simple Steps of How To Make Black Garlic

Do you love garlic but sometimes get caught off guard due to its pungent flavor? I totally understand what you feel and I have a solution for that. Black Garlic, like normal garlic without the pungent flavor, contains allicin which is a strong natural antibiotic, antimicrobial, and helps to boost your immune system! And since I discovered black garlic, it’s one of those things that can’t be missing from my cupboard! The reaction that transforms normal garlic into black garlic is called the Maillard (french word) reaction of amino acids and reducing sugars.

Health Benefits of Garlic

Beyond its culinary uses, garlic has been used for centuries for its medicinal properties. Rich in vitamins and minerals, garlic is a potent natural remedy for a variety of health issues. Here are some of the key benefits.

  1. Boosts Immune System: Garlic is packed with antioxidants that help boost your immune system, making you less susceptible to colds and other infections.
  2. Heart Health: Garlic has been shown to lower cholesterol and blood pressure, reducing the risk of heart disease.
  3. Anti-inflammatory: Garlic contains compounds that have anti-inflammatory properties, which can help alleviate symptoms of arthritis and other inflammatory conditions.
  4. Detoxification: Garlic aids in detoxifying the body by helping to eliminate harmful toxins.
  5. Antibacterial and Antiviral: Garlic has natural antibacterial and antiviral properties, making it effective against infections.
  6. Cancer Prevention: Some studies suggest that garlic may help prevent certain types of cancer, including stomach and colorectal cancer.

    How To Make Black Garlic

    What You’ll Need:

    • Rice cooker or Dehydrator
    • Cling film
    • Foil

    Easy Steps To Make Black Garlic:

    • To make your black Garlic you could use either a dehydrator by wrapping your garlic bulbs with a layer of cling film and 2 layers of foil which will prevent it to dry out too quick.
    • Set the temperature at 60 C and leave it there for about 4-8 weeks. Remember to reset the timer once it stops working. It takes a while but you can just leave your life in the meantime.
    • Alternatively, you can use a rice cooker. Wrap the garlic with the double layer of cling film and foil and place the bulbs at the bottom. Set the rice cooker to keep warm function and leave it there for about 3 weeks.
    • For both methods check when it’s ready by just squeezing it with your fingers and it should have a soft texture.

    Using (Black) Garlic in the Kitchen

    In the kitchen, garlic adds depth and flavor to a wide variety of dishes. Whether you’re making a classic pasta sauce or a flavorful stir-fry, garlic is a versatile ingredient that can elevate any dish. To get the most flavor from your garlic, try crushing or mincing it and allowing it to sit for a few minutes before adding it to your recipe.

    Enjoy the black garlic with your favorite meal! I personally love to spread it alone on bread but you can also try it on dips, sauces, marinades, salad dressings, or even condiments! It can almost fit any meal.

    Garlic is more than a kitchen basics – it’s a valuable addition to your kitchen and your dishes. Try the black garlic recipe at home and improve your health while you level up your meal.

    Unearthing Nature’s Secret: The Magic of Leaf Mold for Your Garden

    Unearthing Nature’s Secret: The Magic of Leaf Mold for Your Garden

    Did you know that you can turn dry leaves from your local woods into one of the best soil amendments for your garden? I took a walk in the local woods in London and collected leaves on the ground. It’s a waste for others, but for us gardeners, it’s a hidden gem.

    Leaf mold is no more than the layer of fallen forest leaves decomposed by fungi over time. The best part? This organic, all-natural soil conditioner is readily available, teeming with beneficial microorganisms, and absolutely free!

    So if you are looking for a free soil amendment that is jam-packed with microorganisms and easy to find, leaf mold is exactly what you need!

    Garden Benefits in Abundance

    1. Integrating leaf mold into your garden unlocks a treasure trove of advantages.
    2. Enhances soil structure: Makes it lighter and more aerated, fostering healthy root growth.
    3. Retains moisture: Helps soil retain moisture, reducing the need for frequent watering.
    4. Acts as a slow-release fertilizer: Provides a consistent supply of nutrients for steady, robust plant growth.
    5. Suppresses weeds: Forms an organic mulch that blocks sunlight from reaching weed seeds, disrupting their germination process.
    6. Low-maintenance: Saves time and effort on weeding, leading to a more beautiful garden with less work.

    Rustling up Your Own Leaf Mold

    Prepare for Collection:

    • Choose an area free from chemicals and pesticides.
    • Check with your local council for any regulations regarding the collection of leaf mold.
    • Look out for diseased plants in the area and avoid collecting leaves from these plants.

    Unearthing Leaf Mold:

    • Venture out into your chosen area.
    • Brush aside the first layer of dry leaves to reveal the dark brown, earthy-textured substrate below.
    • Collect the leaf mold using a rake or your hands.

    Using Leaf Mold:

    • Use the collected leaf mold as mulch to protect and nourish your garden plants.
    • Incorporate it into a seed soil mix to improve soil structure and provide nutrients.
    • Use it as a base for homemade potting soil to enhance plant growth.

    Creating Your Own Leaf Mold:

    • Collect dry leaves from your local park or garden.
    • Pack the leaves into a bin bag, and poke some holes in the bag for aeration.
    • Leave the bag in a cool, damp area and let nature decompose the leaves over time. 
    • In a few years, you’ll have your own batch of earthy-textured leaf mold ready for use.

    Additional Tips:

    • Turn the leaf pile occasionally to aid decomposition.
    • Keep the pile moist but not soggy to encourage decomposition
    •  Use a mix of different types of leaves for a nutrient-rich leaf mold.

    A few recommendations before choosing the area. Make sure it has not been sprayed by any chemicals, check with your council for any regulations on collecting leaf mold and be careful for diseased plants around the area.

    In a world where the best things in life are free, leaf mold proves this saying. So, the next time you see a pile of fallen leaves, remember that they are not only a reminder of the changing seasons, but also an excellent opportunity to naturally improve the health and vitality of your garden!

    Happy growing!

    0
      0
      Your Cart
      Your cart is emptyReturn to Shop