Why Spinach Should Be Your New Go-To Plant for Shady Gardens

Why Spinach Should Be Your New Go-To Plant for Shady Gardens

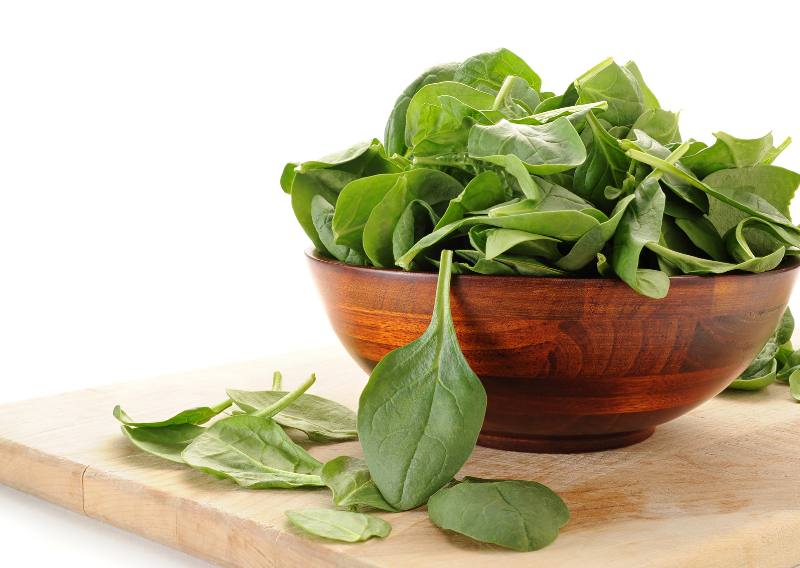
If you’re looking for a plant that’s delicious and easy to grow, spinach might be one of the best options for you. Spinach is incredibly robust, tolerating almost fully shaded areas with ease. What’s more, it’s delightfully low-maintenance and yields a high return on your green thumb efforts. Growing spinach is as easy as pie, even for beginners in gardening. Even if you don’t have a large space, spinach can easily grow on small pot and they also thrive in a vertical garden!

These leafy greens are amazing. Not only can you pluck the fresh leaves right off the plant for a tasty salad or smoothie addition, but the productivity of spinach also lends itself beautifully to preservation. With an abundant plant like this, you’ll find that freezing or dehydrating your spinach for use later is a total breeze.

We always plant spinach and we have them in our garden. We enjoy it fresh in our veggie salads, it also tastes great if it’s steamed or stir-fried. You will never go wrong with this plant.

Growing Spinach In Your Garden

Starting spinach indoors and planting it in succession is a piece of cake. It doesn’t need to bask in full sun to be happy and healthy. Quite the opposite, in fact! It thrives best in cooler, shady environments, making it an excellent choice if you’re looking to make good use of your garden’s shadowy corners.

And for those of you worrying about not having a suitably shady spot in your garden, no need to fear! Spinach is highly adaptable and can simply be planted under a tall plant to enjoy the essential shade it needs to flourish.

Also take note that every 2-3 weeks after your initial planting, you can direct sow more seeds. This allows you to enjoy a continuous harvest in waves, rather than being overwhelmed with a single, large yield. It’s like having your very own spinach supermarket right in your backyard!

    Health Benefits of Spinach

    Spinach is often hailed as a nutritional powerhouse, and for good reason. Packed with vitamins, minerals, and antioxidants, this green giant offers a range of health benefits, including:

    Rich in Nutrients:
    Spinach is loaded with vitamins A, C, and K, as well as folate, iron, and calcium. These nutrients play vital roles in maintaining overall health, from supporting immune function to promoting bone health.

    Antioxidant Properties:
    Spinach is a rich source of antioxidants, including beta-carotene and lutein. These compounds help protect your body from oxidative stress and reduce the risk of chronic diseases.

    Heart Health:
    The high levels of potassium and magnesium in spinach are beneficial for heart health. These minerals help regulate blood pressure and improve cardiovascular function. 

    Improved Digestion:
    Spinach contains fiber, which aids in digestion and helps prevent constipation. It also promotes a healthy gut microbiome, which is essential for overall digestive health.

    Cancer Prevention:
    Some studies suggest that the antioxidants and phytochemicals in spinach may help reduce the risk of certain cancers, including breast and prostate cancer.

    Spinach is not just a nutritious addition to your diet; it’s also a great plant to grow in your garden. With its health benefits and ease of planting, spinach is a must-have for aspiring gardeners looking to boost their garden’s productivity and their own health.

    It’s time to roll up your sleeves, grab your gardening gloves, and give spinach a place in your garden.

    Happy growing!

    How to Make Plant-based Honey from Dandelions: A Sweet and Healthy Recipe

    How to Make Plant-based Honey from Dandelions: A Sweet and Healthy Recipe

    Dandelions, often dismissed as pesky weeds and ignored in the backyard, are nature’s little wonders, full of vitamins, minerals, and antioxidants. They have been used for centuries in traditional medicine for their numerous health benefits. But did you know that these sunny flowers can also be transformed into plant-based honey that rivals the sweetness of traditional honey?

    We absolutely love this plant-based honey. It tastes great when you spread it on toast or pancakes and add it as a sweetener to your tea. Sometimes we get creative and use this as a natural sweetener for our desserts, such as granola bars.

    Today, we’re going on a unique culinary adventure. We’re going to create our very own vegan honey, using a flower that’s oh-so-commonly found in your backyard – the dandelion.

    The Magic of Dandelions

    Did you know that this lovely little flower is not just a pretty sight, but also packs a punch of health benefits? Here are a few to get you excited:

    • Combatting inflammation: Dandelions are well-known for their anti-inflammatory properties.
    • Aiding weight loss: Yes, these flowers can help you in your fitness journey.
    • Reducing cancer risk: Who knew such a common flower could potentially help keep the Big C at bay?
    • Boosting the immune system: Need a natural immunity booster? One teaspoon of this will help to boost your immune system.

    In case you’re wondering, Dandelion honey is a fantastic honey substitute that can be enjoyed by vegans and those who may have allergies to traditional bee honey. And what’s more, it has a very similar flavor to the bee’s honey!

      How To Make Vegan Honey Using Dandelion

      For our DIY Dandelion honey, you’ll need about 2 cups (100g) of dandelion flowers, minus the stalks. You could either look around your backyard or even forage them from your local park – just make sure they’re free from any chemical sprays.

      Preparing Your Petals: Once you’ve gathered your flowers, give the petals a good soak in cold water for about five minutes. This gives any little critters a chance to escape. Then, strain well using a fine sieve.

      Creating the Infusion: Take your petals and place them in a saucepan along with 1.5 cups of water (350 ml) and two organic lemon slices. Bring this mix to a boil over high heat, then reduce the heat, letting it simmer for around 15 minutes. Remove the pan from heat and let it infuse overnight.

      Straining and Sweetening: Strain your dandelion tea through a cheesecloth, making sure to squeeze out every precious drop. Discard the solids. Next, weigh the liquid and match it with the same weight of sugar.

      Take your liquid, pour it back into the pan, and add the sugar. Start with a gentle heat, stirring until the sugar dissolves. Then, increase the heat slightly and let it bubble away for about 15 minutes.

      Storing Your Sweet Success: Voilà! Your dandelion honey is ready. Store it in a sealed, sterilized jar at room temperature. It should keep for several months, ready for you to enjoy a spoonful of this whenever you please.

      Plant-based Honey Dandelion is easy to make, and it offers a sweet and sustainable option for your garden. It can easily be one of your favorites! So, why not add a touch of sweetness to your life with this special flower from nature’s own backyard?

      Happy growing and happy eating!

      Budget-Friendly DIY Backyard Firepit: How To Do It In 4 Easy Steps

      Budget-Friendly DIY Backyard Firepit: How To Do It In 4 Easy Steps

      I was out for a walk with my fiance when I saw lots of unused bricks in my neighbor’s front garden. I immediately got an idea about building a DIY firepit, so I asked them if I could pick them up. In return, I gave them a 1.5-liter bottle of spicy oil (3 years old) and one of our lovely jade plant cuttings to say thanks for their kindness.

      I’m a believer that adding a firepit to your outdoor space is a great idea, whether you’re a seasoned gardener or just starting. When it comes to creating the perfect outdoor space, it really is a game changer. Not only does it provide warmth and light, but it also adds a cozy and inviting ambiance that will make your garden the ultimate hangout spot.

      But before you start, there are three main points to remember

      1. You have to choose the right spot

        Before you start placing the bricks, it’s crucial to select the perfect spot for your firepit. Consider the size of your garden, proximity to flammable materials, and the overall aesthetic. For example, placing the firepit near a seating area creates a cozy ambiance, while keeping it away from overhanging trees ensures safety.

      1. Selecting materials

        One of the reasons why I love doing DIY projects is because of the opportunity to get creative with materials and repurpose the things that most people thought were a waste. When constructing a firepit, you have a range of options to suit your style. You may opt for classic brick or stone to add rustic charm and durability. On the other hand, metal fire bowls or repurposed washing machine drums offer a modern twist with ease of assembly. Consider the aesthetic appeal, maintenance requirements, and longevity of each material before making your choice. But, of course, if you can recycle some materials, that would be the best option.

      3. Building your firepit
      Now, let’s roll up our sleeves and dive into the construction process. Here’s a step-by-step guide to building your DIY firepit. There are many ways to build, but I’ll teach you how I did mine.

      Materials Needed:

      bricks
      natural decorative stones
      handmade tripod metal
      handmade aluminum pan

      Step-By-Step Guide

      Step 1: Mark the area (optional): Use a can of spray paint or a length of rope to outline the shape and size of your firepit on the ground.

      Step 2: Arrange the Outer Ring: Place your chosen materials (in my case, bricks from my neighbor) in a circle of 2 layers to form the outer ring of your firepit, ensuring they are snugly fitted together.

      Step 3: Add base material: Fill the inside area with a layer of 2 bags of natural decorative stones, ensuring it is level and compacted to provide stability. You can walk over it to flat it out and make the stone level.

      Step 4: Place a handmade tripod metal: This will serve as a foundation so you can hang your handmade aluminum pan. It’s lovely to cook soup in your garden!

      With a little imagination and elbow grease, crafting your DIY firepit can elevate your garden from ordinary to extraordinary. Whether you’re roasting marshmallows with the kids, sharing stories with friends, cooking soup for dinner, or simply enjoying the warmth of the flames at night, your DIY firepit will become the heart of your garden. So why wait? Start a new, memorable experience with your DIY Firepit!

      Easy Kratky Method: Grow Happy Plants Without Soil at Home

      Easy Kratky Method: Grow Happy Plants Without Soil at Home

      Do you want to start gardening, but you’re a bit lost and don’t know what or where to start? The Kratky Method is the perfect one for you. The simplicity, low cost, and minimal maintenance requirements of the Kratky method make it an excellent choice for beginners looking to start with hydroponic gardening. Personally, I have a few friends who started here and are now hooked on gardening.

      Why should you try the Kratky Method?

      There are dozens of reasons, but I’ll tell you the top three, so you can’t say no to this method.

      1. The Beauty of Simplicity.

      The Kratky method is a hydroponic approach that does not require pumps, aerators, or complex fertilizer solutions. You only need a pot, recycled bottled water, and a fertilizer solution. That is it. Easy peasy. Take it from me: I grow chilies in my kitchen without the need for soil or frequent watering. The Kratky method makes it possible for us to experience fresh, homegrown chiles with minimal effort.

      2. Perfect for small spaces.

      One of the most important advantages of the Kratky method is its adaptability to small environments. Whether you live in an apartment or have limited outside space, you can easily create a Kratky garden in your window or balcony. This makes it ideal for people living in urban areas (like me!) who want to experience the joys of gardening without a backyard. For instance, you can grow herbs like basil, mint, and cilantro in small containers, providing you with a constant supply of fresh herbs for cooking.

      3. Sustainable and Cost-Effective

      In addition to being simple and space-efficient, the Kratky method is also environmentally friendly and cost-effective. You reduce the risk of soil-borne diseases and pests by eliminating the need for soil. Because the nutrient solution is contained and reused, there is minimal waste compared to traditional gardening methods. For example, imagine growing lettuce in a Kratky system. Not only does it use less water than traditional gardening, but it also saves money because you do not need to buy soil or fertilizer. Plus, you can eat fresh, organic greens right at home.

        Let’s go to the exciting part- The step-by-step method:

        Step 1: Gather Your Materials

        Before you start, make sure you have all the necessary materials:

        -A container for your plants (e.g., a bucket, pot)
        -Recycled bottled water
        -Growing medium (e.g., perlite or clay pellets)
        -Nutrient solution
        -pH test kit
        -Seeds or seedlings of your choice

        Step 2: Prepare Your Container

        Cut the bottled water in half, then place your pot. Fill the container with water, leaving about an inch of space below the lid.

        Step 3: Add Nutrient Solution

        Add the recommended amount of nutrient solution to the water in your container. Follow the instructions on the package carefully, as overfeeding can harm your plants. Use a pH test kit to ensure the pH level of the solution is between 5.5 and 6.5, as this is optimal for plant growth.

        Step 4: Plant Your Seeds or Seedlings Place your seeds or seedlings into the net pots and set them in the holes in the lid of your container. Make sure the roots are submerged in the nutrient solution.

        Step 5: Monitor and Maintain Check the water level in your container regularly and top up as needed. Monitor the pH level and adjust it if necessary. Keep an eye out for any signs of nutrient deficiencies or pests

        Step 6: Harvest Your Plants

        Depending on the type of plants you’re growing, you should be able to harvest them in a few weeks to a few months. Enjoy your fresh, homegrown produce!

        Do you see how convenient it is to do this? It’s really easy and low-maintenance once it’s set up. You could grow any sort of plant with this method, and you don’t need any air stone. It’s a great way to extend the life span of plants like basil, parsley, or sage that you commonly buy from the supermarket. I made even a few plants of chilies with this method and got the fruit with no issue! Give it a try, and let me know what plants you have planted.

        Happy growing.

        Easy Recipe: How To Cook Plant-based Jackfruit Tagine

        Easy Recipe: How To Cook Plant-based Jackfruit Tagine

        Jackfruit is a tree species in the same family as figs, mulberry, and breadfruit. It’s the largest fruit tree in the world, and the fruit has a really distinctive smell which stopped me from trying the taste for a really long time. However, following the recipe of jackfruit vegan tagine, it’s like eating a meat stew with a delicious and warm flavor.

        This plant-based version of the traditional jackfruit tagine is not only delicious but also incredibly nutritious. So if you’re looking for a dish that combines the exotic flavors of Moroccan cuisine with the health benefits of a tropical superfood, stay until the end of the blog, and I’ll teach you how to cook it in just a few easy steps.

        Plant-based Jackfruit Tagine Recipe

        Prepare these ingredients:

        1 x Red onion
        2 x Garlic cloves
        1 x Knob of Ginger
        6 x Apricots
        4 x Prunes
        1 x tsp cumin seeds
        2 x tsp coriander seeds
        1 x tbsp harissa paste
        Kallo stock paste
        1 x Tin of tomatoes
        1 x Tin jackfruit

        Follow these simple and easy steps:

        1. Mix 1 x tsp cumin seeds and 2 x tsp coriander seeds in a pan and toast them

        2. Once toasted, grind them into a powder

        3. Chop 1 x Knob of Ginger, 1 x Red onion, 2 x Garlic cloves, 6 x Apricots, and add dates

        4. Heat olive oil in a large pot and sweat off the chopped ingredients

        5. Add kallo paste, 1 x tbsp harissa paste, and 1 x Tin of tomatoes. Stir well to combine and bring the mixture to a simmer.

        6. Add your grinded spices and 1 x Tin jackfruit

        7. Cover the pot and let the tagine cook on low heat for 45 minutes to 1 hour, until the jackfruit is tender and the flavors have melded together

        Tip: To taste better, top it with almonds, pomegranate, and fresh coriander and serve it with brown rice for a full meal.

          Growing Jackfruit in Your Garden

          For those with a green thumb, growing jackfruit can be a rewarding experience. Jackfruit trees thrive in tropical and subtropical climates, so if you live in a warm region, you might be able to cultivate this amazing fruit right in your backyard. Here are some tips for aspiring gardeners:

          1. Climate and Soil: Jackfruit trees prefer a warm, humid climate and well-draining soil. They can grow quite tall, so ensure you have enough space for the tree to spread its branches.

          2. Planting and Care: Plant jackfruit seeds or saplings in a sunny spot with ample room to grow. Water the tree regularly, especially during dry periods, and provide it with a balanced fertilizer to promote healthy growth.

          3. Pest Management: Keep an eye out for common pests like fruit flies and aphids. Using organic pest control methods, such as neem oil, can help protect your jackfruit tree without harming beneficial insects.

          4. Harvesting: It can take several years for a jackfruit tree to bear fruit, but the wait is worth it. Once the fruit is ripe, it can be harvested and used in various culinary creations, including our delectable jackfruit tagine.

          Whether you’re a beginner gardener wanting to grow jackfruit or a home cook looking to try new plant-based recipes, this jackfruit tagine is a must-have. Give it a shot and let the unique flavors and health benefits of jackfruit mesmerize you!

          Happy growing and cooking!

          0
            0
            Your Cart
            Your cart is emptyReturn to Shop