How To Cook Homemade Tofu: Easy and Delicious Staple in Our Plant-Based Kitchen

How To Cook Homemade Tofu: Easy and Delicious Staple in Our Plant-Based Kitchen

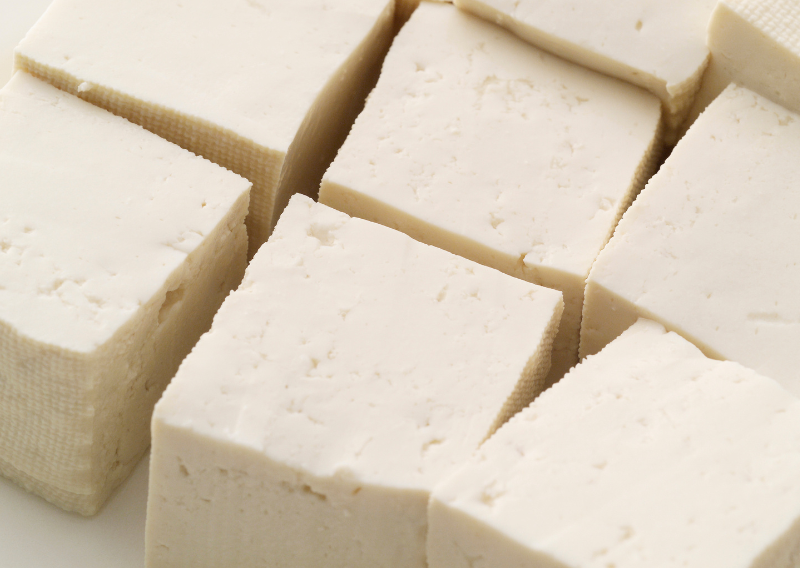
Tofu is an absolute star in our kitchen. Whether it’s dumplings, noodles, ramen, or even a fresh summer salad, tofu brings a unique and versatile flavor and texture that’s hard to match. The best part? Making your own homemade, organic tofu is a far cry from the mass-produced supermarket variety, and trust us, it’s a lot easier than you may think. In our kitchen, tofu is a must-have ingredient that always finds its way into our fridge.

Also known as bean curd, tofu is essentially the product of coagulated soy milk that’s been pressed into soft white blocks. It’s almost a little humorous when you discover that this wonderful food was an unintentional invention in China. A simple experiment of flavoring soybeans with Nagari, a type of seaweed, accidentally resulted in the creation of bean curd!

How to Make Homemade Tofu

Ingredients:

  • 5 cups of plain soy milk
  • 1/2 cup of water
  • 2 tablespoons of lemon juice

Instructions:

  1. Begin by combining your water and lemon juice, which will act as a coagulant.
  2. Heat your soy milk until it boils, stirring constantly to avoid burning. Once done, remove it from the heat and continue stirring for an additional 1-2 minutes.
  3. Gradually stir your water and lemon mixture into the soy milk. Be sure to stop as soon as the mixture starts to thicken to avoid breaking the curd.
  4. Let the mixture rest for about 15 minutes until the liquid separates completely. If it’s still not solid, add a few more drops of lemon juice.
  5. Prepare a colander lined with cheesecloth over a bowl. Pour your mixture in, then carefully gather the sides of the cloth to drain out most of the water.
  6. Re-wrap the curds in the cloth to form a loaf shape. Place a weight on top and let it sit for 15-30 minutes.
  7. Finally, remove the cheesecloth and let the tofu sit in cold water for a few minutes. Your homemade tofu is now ready to be enjoyed with your favorite meal

Why Make Your Own Tofu?

While buying tofu from the supermarket may seem convenient, it often comes packaged in plastic, and is shipped from far-off places, adding unnecessary waste to our environment. Supermarket tofu also tends to be loaded with preservatives. In contrast, homemade tofu gives you complete control over the ingredients, ensuring a fresher, healthier product, free of preservatives.

By using your own soybeans, you also support local agriculture and significantly reduce your carbon footprint. Plus, there’s no packaging to worry about!

The Nutritional Perks of Homemade Tofu

Apart from the satisfaction of making your own food, homemade tofu also has nutritional advantages over store-bought versions. It’s rich in protein, iron, and calcium, making it an excellent addition to a plant-based diet. You can also experiment with different soybean varieties, giving your tofu a unique twist of flavors and textures each time you make it.

So why not give homemade tofu a try? You might just find it becomes a staple in your own plant-based kitchen too!

Clone Tomato Plants: An Easy Guide for Aspiring Gardeners

Clone Tomato Plants: An Easy Guide for Aspiring Gardeners

  • Rich in Vitamins and Minerals: They’re loaded with vitamin C for a healthy immune system, vitamin K for strong bones, potassium to keep your muscles happy, and folate, which is important for overall well-being.
  • High in Antioxidants: Not only does it give tomatoes their vibrant color, but it’s also been linked to a lower risk of serious diseases like cancer and heart problems.
  • Supports Heart Health: The potassium and lycopene combo can help lower your blood pressure and keep your cholesterol in check, all good things for a healthy heart.
  • Improves Skin Health: The vitamins and antioxidants they have can help shield your skin from sun damage, even out your skin texture, and make sunburn a little less likely.
  • Boosts Digestive Health: they’re packed with fiber, which keeps things moving smoothly and helps prevent constipation.
[/et_pb_text]

Make sure to remove the lower leaves of all your plants to improve aeration and reduce the risk of soil-borne disease. Add the leaves to your compost or worm farm!

I collect empty plastic bottles from my neighbors to reuse in the garden and reduce waste, and I will gift lots of these plants to whoever wants one! You can recycle empty plastic bottles as well to help the environment.

Happy growing!

[/et_pb_column][/et_pb_row][/et_pb_section]

I have such good memories when I think about tomatoes. I remember the smell of tomato plants combined with basil every evening when my grandpa was watering his garden. Tomatoes are a favorite crop by gardeners. They’re flexible, tasty, and full of health benefits. You can also clone the plant with a super straightforward method, don’t overcomplicate it, plain water works great! You can make multiple plants of tomatoes from a single one that you started from seed or bought from the nursery.

How to Clone Tomato Plants

1. Choose a healthy, disease-free tomato plant that has traits you want to replicate.

2. Using a knife or scissors, cut a 6-8 inch section from a healthy stem, preferably with no flowers or fruit. Ensure there are at least two sets of leaves on the cutting.

3. Remove the lower leaves, leaving only the top set. This helps the cutting focus its energy on developing roots.

4. Place the suckers/side shots (growing in between the main stem and the leaves) in recycled bottled water. If using water, change it every 3 days to prevent stagnation. Keep the cuttings in a warm, bright location but out of direct sunlight. Within a week or two, roots should begin to develop.

5. Once the cuttings have developed a strong root system, transplant them into your garden or larger pots.

Why Clone Tomato Plants?

Cloning, also known as propagation, involves taking cuttings from a mature tomato plant and nurturing them to develop roots. This approach can be useful because it lets you:

  • Preserve Desired Traits: Cloning ensures that your new plants retain the desirable traits of the parent plant, such as flavor, size, and disease resistance.
  • Save Time: Cloning skips the germination step, allowing your plants to grow and produce fruit faster.
  • Increase yield: More plants equals more tomatoes. Cloning allows you to make better use of your garden space and increase productivity.

Health Benefits of Tomatoes

  • Rich in Vitamins and Minerals: They’re loaded with vitamin C for a healthy immune system, vitamin K for strong bones, potassium to keep your muscles happy, and folate, which is important for overall well-being.
  • High in Antioxidants: Not only does it give tomatoes their vibrant color, but it’s also been linked to a lower risk of serious diseases like cancer and heart problems.
  • Supports Heart Health: The potassium and lycopene combo can help lower your blood pressure and keep your cholesterol in check, all good things for a healthy heart.
  • Improves Skin Health: The vitamins and antioxidants they have can help shield your skin from sun damage, even out your skin texture, and make sunburn a little less likely.
  • Boosts Digestive Health: they’re packed with fiber, which keeps things moving smoothly and helps prevent constipation.

Make sure to remove the lower leaves of all your plants to improve aeration and reduce the risk of soil-borne disease. Add the leaves to your compost or worm farm!

I collect empty plastic bottles from my neighbors to reuse in the garden and reduce waste, and I will gift lots of these plants to whoever wants one! You can recycle empty plastic bottles as well to help the environment.

Happy growing!

Zero Waste Apple: How to Use Every Part of This Amazing Fruit

Zero Waste Apple: How to Use Every Part of This Amazing Fruit

Did you know that there’s a waste of over 4.4 million apples every single day in the UK? Before we moved out of London, my fiance, Iasmina (@lajatattoo) and I, picked up only windfall / unripe apples in Walthamstow Marshes and turned them into something valuable for our house.

We managed to turn the windfall apples into apple cider vinegar, fruit leather, and pectin. In this blog, I’ll show you the ingredients and how you can do it in easy and simple steps.

DIY Apple-Based Projects

For those who love DIY projects, apples offer endless possibilities. Here are the things that we made and the instructions on how to do them.

Apple Cider Vinegar:

-1/2 Jar of unripe/ripe apples
-1 tablespoon of sugar for each cup of water
-Enough water to fill the jar
-Cover and leave for 6 months

Cut your apples into small pieces and add them to a jar. Cover with enough water to fill the jar and add 1 tablespoon of sugar for each cup of water. Cover and label it, and leave it at room temperature for 6 months. Stir every day for the first 2 weeks. Strain and leave the liquid to ferment for one month or longer. If you see a pellicle forming, it’s called a mother, and you can save it and use it for another batch.

Vinegar could be used not only in the kitchen but also as a great natural surface cleaner and to improve the health of your hair!

Fruit Leather:

-4 cups of peeled, chopped apples
-1/2 cup of water
-2 Tbsp. of brown sugar
-1 teaspoon of cinnamon

Chop apples and place them in a large pot. Add 1/2 cup of water and 2 tablespoons of brown sugar. Cook the fruit until it softens by boiling it in an average heat. It can help soften the apple and make it easier to blend.

Place the apple in a blender to puree until it’s completely smooth. Spread the apple puree onto the lined baking sheet. Aim for a thin, even layer, about 1/4 inch thick. Dehydrate the apple leather in the oven for 3–4 hours, or until the center is no longer sticky to the touch. Cut parchment paper straps and roll fruit leather before you store it in a jar.

Fruit leather can be stored for up to 9 months in the fridge or freezer!

Pectin:

1. Any kind of apple, including peel, etc.
2. Add enough water to make them float
3. Boil for 2 hours
4. Strain & simmer until it reduces
5. Can in a sterile jar

Wash the apples but leave the peels on. Cut them into quarters. Place the apples in a large pot and add enough water just to cover them. Bring it to a boil, then reduce heat and simmer for 40–45 minutes, or until the apples are very soft. Strain the mixture through cheesecloth or a thin kitchen towel.

Discard the solids in the cloth and return the strained liquid to the pot. Bring the liquid back to a boil and simmer for another 15-20 minutes, or until the liquid thickens and reduces by half again. You’ll know it’s done when the consistency is syrupy. Let the pectin cool completely. You can use it right away in your jams and jellies, or store it for later.

Making your own pectin helps to save money and reduce your wastage as you can use any part of your apples!

Final Thoughts

Adopting a zero-waste mindset when it comes to apples not only helps the environment, but it also allows you to reap the full benefits of this incredible fruit. From nutritious bites to homemade vinegar, skincare, and even new garden seedlings, every component of the apple serves a purpose.

So, the next time you eat an apple, think carefully before dumping the crumbs. Embrace zero-waste methods and explore the limitless possibilities that apples have to offer.

Happy gardening, and happy cooking!

Small Space Garden: 3 Easy Tips to Grow Your Own Food

Small Space Garden: 3 Easy Tips to Grow Your Own Food

The space available or your budget doesn’t matter, you can start growing your own food in any space using cheap materials! Creating your own garden is one of the most satisfying hobbies you can pursue, regardless of how much space you have.

Start small and don’t make it overcomplicated. You may believe that gardening requires a large backyard, but with a little imagination and careful planning, you can grow your own food in the smallest areas. Just enjoy the process and experiment with what you have! In this blog, I’ll share three effective and space-saving gardening methods that will have you growing in no time.

Vertical Gardening

Vertical gardening is an excellent technique for maximizing your growing space by using vertical surfaces. Instead of spreading plants horizontally, grow them vertically on walls, trellises, or other structures. This strategy is ideal for smaller patios, balconies, and even indoor places.

Materials:

-8 x 5L bottles (plastic type 2 – HDPE)
-Drill
-1 x drill bit 35 mm gauge
-Hammer and nail
-1 x expanding wood trellis
-Vermiculite
-Compost mix
-Straw

How To Do It: Step-By-Step Procedure:

1. Drill the bottom of a 5L bottle (plastic type 2 – HDPE) using a 35mm drill bit and make a hole to join 2 bottles

2. Square mark the opening of the bottle and cut using a cutter

3. Make multiple small holes on every cap and secure them in place

4. Get your expanding wood trellis and fix it on the wall or fence

5. Staple the DIY bottles on the trellis

6. Add vermiculite for drainage and add compost mix

7. Plant your chosen plant 1 for each bottle then add mulch (optional)

8. Paint a white color to the base of the DIY bottle and water only the top layer

NOTE: make your own version using any material available and have fun growing your own food using a small

Hanging Containers

Hanging containers are another excellent option to grow vegetables without requiring ground space. These can be hung from the ceiling, balconies, or even walls. They are especially effective for trailing plants and those with small root systems.

Materials:

-2 x plastic bottles (I used 5L bottles) HDPE
-Pyrography pen
-Compost mix
-Natural Twine
-Seed or Plant

Step-by-Step Guide:

1. Cut the top of your plastic bottle

2. Remove the cap and make holes for drainage over the top part (neck) of your bottle

3. Make 4 x holes around the top part of the body of the bottle opposite to each other

4. Make 2 x holes at the bottom for drainage (keep a 3-4 cm gap from the bottom)

5. Put the neck of the bottle upside down inside the body of the bottle

6. Fill up with compost and plant your seed or plant

7. Cut 2 x natural twine pieces of the same length

8. Run 1 piece through 2 x holes of the same bottle and 2 x holes of another bottle and repeat on the other side

Raised Bed Hugelkultur

Materials:

-2x Pallet Collar (they are stackable)
-Cardboard
-Wooden branches
-Twigs
-Spoiled hail, grass trimmings, and food scraps
-Any organic soil
-Perlite (optional)

Simple Steps To Do It

1. Choose a spot that gets plenty of sunlight
2. Lay down logs, branches, and other woody debris as the base
3. Add layers of grass trimmings, leaves, compost, and topsoil
4. Plant your seeds or seedlings, and watch your garden thrive with minimal maintenance

By implementing these tips, you can transform your limited area into a productive and beautiful garden. What are you most interested in? Whether you opt for vertical gardening, hanging containers, or raised bed hugelkultur, you’ll be amazed at how much you can grow with just a little creativity and effort.

Happy growing!

How To Cook Beefsteak Mushroom Tartare At Home

How To Cook Beefsteak Mushroom Tartare At Home

Recently, we went out foraging and spending time surrounded by nature, and this was my first time finding and trying beefsteak mushrooms.

Now, if you’re wondering what a beefsteak mushroom, scientifically known as Fistula hepatica, is, let me explain. It’s a distinct type of mushroom, distinguished by its reddish color that deepens as it matures. Imagine a mushroom with a rusty red top and a lighter beneath. Pretty awesome, right?

These interesting fungi appear throughout the autumn, most commonly on oaks and other trees. They are also known to leave a stain called brown oak. What’s even more intriguing is the common name: beefsteak mushroom. Do you want to guess? It’s because their color is strikingly similar to raw beef.

I’ve put together a simple yet delicious recipe using these beefsteak mushrooms. Here’s what you’ll need:

-1 or 2 Beefsteak mushrooms
-1 apple
-1 Heirloom tomato
-1 lemon
-Olive oil
-1 garlic clove
-3 or 4 chillies
-Chives and chives flowers

How to Cook Beefsteak Mushroom Tartare

Step 1: Prepare the Mushrooms

Give your beefsteak mushrooms a good clean, remove the outer part and any hard bits, and chop them up into small cubes. You’re aiming for a texture similar to traditional beef tartare.

Step 2: Marinate the Mushrooms

Get a medium bowl and toss in your diced mushrooms along with apple, heirloom tomato, soy sauce, olive oil, and lemon juice. Give it a good stir to make sure everything gets a beautiful, even coating.

Step 3: Seasoning

Now, it’s time to jazz it up with some chopped chives and flowers. Give it a taste and adjust the seasoning if needed.

Step 4: Serve it Up

Time to plate up! Arrange your mushroom tartare on a serving plate and garnish it with a sprig of parsley for a pop of color. Serve it with some crackers, and voila, you have a mouth-watering, unique dish right at home!

Note: Beefsteak mushroom tartare is not recommended for storage. The broken-down flesh of the mushrooms creates an ideal environment for bacterial growth. It’s best to prepare and consume the tartare right after making it to enjoy it at its freshest and safest.

    Growing Beefsteak Mushrooms in Your Garden

    Beefsteak mushrooms (Fistulina hepatica) are relatively easy to grow, making them an excellent choice for gardeners of all levels. Of course, you can forage like what I did but if you’re keen to planting them, here’s a simple guide to get you started:

    1. Finding the Right Spot:

    Beefsteak mushrooms thrive in cool, shaded areas with high humidity. They naturally grow on decaying oak, chestnut, or sweet chestnut trees, so if you have one of these in your garden, you’re in luck.

    2. Preparing the Substrate:

    You can grow beefsteak mushrooms on logs or stumps. Choose freshly cut hardwood logs, about 3 to 4 feet in length and 8 to 12 inches in diameter. Avoid logs that have been sitting for more than a month, as they might have lost too much moisture.

    3. Inoculation:

    Drill holes into the logs about 6 inches apart in a diamond pattern. Insert mushroom spawns (available at your local garden store) into the holes and seal them with wax to prevent contamination.

    4. Maintenance:

    Keep the logs in a shaded, humid area. Water them regularly, especially during dry spells. Patience is key, as it can take several months to a year for mushrooms to start fruiting.

    5. Harvesting:

    When your mushrooms finally appear, harvest them by gently twisting and pulling. They are best enjoyed fresh, so try to use them soon after picking.

    So, who knew a day out in nature would lead to such a delicious discovery? Beefsteak mushroom’s rich, savory taste and unique texture are sure to win over any food enthusiast. I hope you’ll feel inspired to try this recipe and maybe even go on your own little foraging adventure, too!

    Happy cooking!

    0
      0
      Your Cart
      Your cart is emptyReturn to Shop