 COLOR2")
I absolutely adore tomatoes. There’s something so satisfying about growing them in our garden. From the moment I plant the seeds, to watching the vines flourish under the sun, each stage is a reminder of nature’s beauty and bounty. We love to pick them up, they have many amazing colors and different varieties. In our garden, we don’t just grow red tomatoes. We also plant different and special varieties, such as kryptonite tomatoes, dark galaxy tomatoes, and yellow heirloom tomatoes.
Tomatoes never fail to impress us, as they’re incredibly versatile in the kitchen. We use them in almost everything, and they’re a must-have in our garden! From tomato sauce and passata to tomato paste and powder, they add flavor to countless dishes. We also enjoy dehydrating them to make sun-dried tomatoes in olive oil.
They’re tasty, healthy, versatile, and most of the gardener’s favorites. However, storing and using their seeds for the next planting season isn’t as simple as plucking the fruit and sowing the seeds directly into the soil. But don’t worry, I’ll guide you through the process.

Choosing the Right Tomato
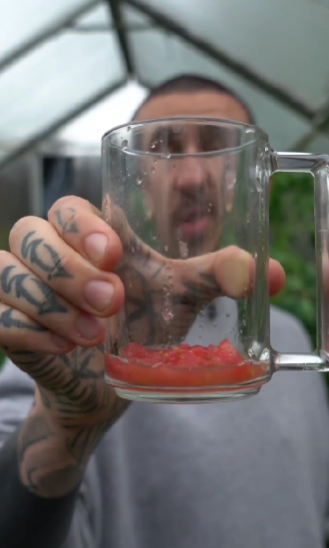
It all starts with selecting a fully ripe and ready-to-harvest tomato. When you slice open a tomato, there’s a gelatine inside that acts as a sprout inhibitor. The gelatine protects the seeds, and it makes sure the seeds don’t sprout inside the fruit. Fascinating, right?
Nature’s Own Germination Process
Here’s how nature intended it: a ripe tomato falls to the ground, but the ground temperature is usually too cold for immediate germination. Plus, the protective gel around the seeds helps ensure they don’t jump into action too soon. But come spring, with the warmer temperatures, and the long-gone gel, the seeds bounce back into life and start to germinate.
Mimicking Nature’s Way
You can recreate this natural process at home with a few easy steps.
- Just scoop the seeds and gelatin in a cup.
- Cover the jar with cling film and let it sit for about 2-3 days, depending on the temperature.
- Mix it twice a day to avoid mold but if you get any, don’t worry, as it won’t affect the seeds. After 2-3 days, your seeds should be sinked to the bottom. Good seeds always sink to the bottom, but a few varieties might just float.
- Drain and wash your seeds and let them dry on a paper plate. Don’t use kitchen towels, or they will stick to it.
- Add them to a paper bag when they are completely dry and use them the next season!

The Health Kick of Tomatoes
The perks of tomatoes are really something to take note of. They’re nutritional fruit, loaded with vitamins, minerals, and antioxidants.
Tomatoes get their vibrant red color from lycopene, a potent antioxidant, which may reduce the risk of heart disease and certain types of cancer. Tomatoes are also abundant in vitamin C for a robust immune system, potassium for regulating blood pressure, folate for cell growth and repair, and vitamin K for healthy bones.
Tomato seeds are nutritional gems, too. They are often dismissed and discarded, but they’re a great source of fiber, promoting digestive health and potentially lowering cholesterol levels. Moreover, they supply protein, healthy fats, and a lot of vitamins and minerals.
So, whether you’re new or experienced in gardening, I highly recommend planting tomatoes in your own garden. Not only will you enjoy the satisfaction of growing your own food, but you’ll also savor the unmatched flavor of homegrown tomatoes in every bite.
Happy growing and eating!
